Sunday 24 December 2023

Adafruit RP2040 Prop-Maker Feather board

 The Adafruit RP2040 Prop-Maker Feather combines the RP2040 processor with a driver for Neopixels, QT Stemma socket, speaker and a battery charger socket.

The board uses a USB-C connector. 
It has a six screw terminals for the three leads for the Neopixels, two for the speaker and one for a button. 
There is a three pin connector for a servo.
The battery connection is top left. It is important to note that this board includes a charging circuit so only use chargeable LiPo batteries or follow the instructions to isolate the charging circuit.


It is important to note that as a power saving feature the Neopixel driver, the servo and the speaker amplifier are only powered when the GPIO23 pin is high (I spent a while trying to find out why the Neopixels were not lighting up until I remembered).

Here is the board operating a Neopixel strip. 


Code to follow.

ADAFRUIT Metro RP2040 Arduino UNO format microcontroller.

 The Adafruit Metro RP2040 takes the Arduino format and adds the Raspberry Pi RP2040.

In addition to the normal UNO I/O, there is a micro-SD socket and Stemma QT socket.


PIMORONI PicoVision dual RP2040

 PIMORONI have released a clever board that combines a Pico W with a second RP2040 chip and supporting electronics complete with an HDMI shaped output, a 3.5mm headphone socket and a micro-SD card reader.

It is available on its own or as part of a complete box set.

I bought the complete box set.

The Pico Vision uses a complete Pico-W board as the main microcontroller, which is attached to the Pico Vision board.
The second RP2040 acts as a GPU.
One of the clever items in the box is a USB splitter cable which allows a USB device to be plugged into the board while the socket is also powering the board.

Now to actually use it.

Sunday 26 November 2023

Raspberry Pi 5 8GB

 The Raspberry Pi 5 was made available for pre-order on the 28 September 2023, with the first ones being released on the 23 October 2023. There was a bit of a demand, and I did not get mine until the 24 November.

THer board comes in the traditional box (note that in deference to one of the designers the chip at 45 degrees to the board is not shown on the picture).


From the outset it was designed to require active cooling, so unlike my three Raspberry Pi 4s in their passively cooled aluminium cases, I bought the official Raspberry Pi 5 case (only the red and white ones were available at that time) which is fitted with a computer controlled fan.

The Rapberry Pi 5 is power hungry, and so a 27W power supply was also bought.
Here is the board.. Note the chip at 45 degrees which is not shown on the box art.
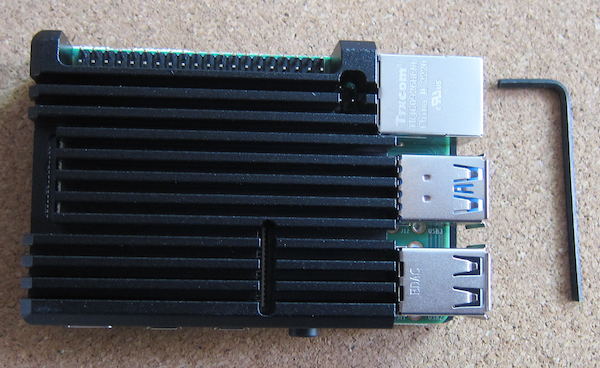
The white object to the left of the top USB socket stack is the fan control socket. It did not mention that you have to remove a cover plug from this socket (the socket is labelled on the board)

Ther case is in thre parts, the white top cover, the white upper cover and the red base.
There are holes to take bolts to hold the Raspberry Pi board and any HATs in place
Here are the three parts of the case. The top showing the bit that covers the GPIO pins.
The packet top right holds the feet and an aluminium heat sink to stick on the CPU.
You can just see the cable that connects the  fan to the boar.
The contents of the packet.

Assembly is easy. 
After removing the board from the packaging, get the heat sink out of the packet. Remove the backing paper from the bottom of the heat sink and carefully apply it to the processor cover.
Then remove the blanking plug from the fan connector by the USB port. Fit the cable connector from the fan. 
Fit the board into the bottom of the case.
Add the top part of the case ( the USB and Ethernet ports are an obvious indicator of which way round everything goes).

It may be possible to run the Raspberry Pi 5 with an older edition of Raspbian/Raspberry Pi OS, but the recommendation is to use the Bookworm edition which includes all the latest drivers.

The Raspberry Pi Imager makes writing the OS to a microSD card quick and painless.

Once the SD card was written,, the Raspberry Pi 5 was connected up and the SD card inserted.

The first boot can take a bit of time while everthing is set up. I did find that it did not find my WiFi, bor my neighbours for that matter), but I had the Ethernet plugged in to speed things up so it was not really an issue.

Once the update had completed, the machine was restarted and I could set the WiFi up in the usual way.

I have no idea if that was something odd in my Pi 5, my set up or a general issue. If you are without an Ethernet connection, this might be an issue.

Tuesday 29 August 2023

Cosmic Unicorn

 Pimoroni's Cosmic Unicorn is one of their range of Pico W Aboard products and comprises a 32 x 32 smart RGB LED matrix. 

There is a complete Pico W attached to the back of the board. The use of a complete Pico W means that you can use the existing certification of the board, which means you can bring Wifi powered products to market quicker as you do not need to get your product certified, it is all off the shelf.
There are four general purpose buttons, a pair of volume up/down buttons, a pair of brightness buttons, a Sleep button and a Reset button (to save wear and tear on the USB socket). There are two STEMMA/QWIIC sockets for I2C breakout board and a speaker.

There is a hanger at the op, four holes in the corners and two holes to take a stand.

Out of the box there is a simple demo application. It suggests you press one of the four buttons (but does not tell you where they are or what they do). The four options were a fire simulator, a supercomputer style display, a rainbow and a calendar (requiring WiFi credentials).

This was a simple UI upgrade, listing the options and tracing the location of the relevant button.
As you might of noticed the options displayed do not reflect that list, but include a clock.

Pimoroni have developed a graphics library that works across a range of display devices. 
The original work on the clock was for an Inky Frame eInk display board. As this seven colour display takes thirty seconds to update the display, the development took place on a LCD Display Pack.

It was very easy to port the code to the Cosmic Unicorn.

Integrating it into the supplied program required some minor changes - which will be detailed later.
Three of the original effects are still available.
The fire effect display.


Wednesday 7 June 2023

Ending the drought - Raspberry Pi 4 4GB

It has been a while since Raspberry Pis have been available (the last one I bought was the end of 2021).

So when Pimoroni had a Raspberry Pi 4 4GB available, I bought one, a power supply and a (black) heat sink case.

The case comes complete with heatsink pads (and some spares).
The case is secured with allen bolts
Using a scalpel, I removed the protective covers from one side of each pad and applied them to the raised areas on the top cover. Once in place the other covers were removed (again using a scalpel).
The top and bottom of the case (with the Raspberry Pi in the middle) was then assembled and screwed together with the allen bolts.


Thursday 5 January 2023

Interrupt driven buttons on the Raspberry Pi Pico

There are two ways to detect the operation of buttons - polling and interrupt.

Polling involves checking the status of the button, which has to occur each time and can be missed if the program is busy elsewhere. It does have the benefit of conceptual simplicity.

Interrupts requires the program to be literally interrupted when the button is pressed, and code to be executed and then the program resumes its normal course. There are a number of complexities created by this method, especially if the task is complicated (things can be in the process of being changed when the interrupt occurs and so the results may not be predicted). There are additional complexities involved in the Micropython implementation (see the documentation here)

The PIMORONI Inky Pack (described here) is fitted with three buttons.


The objective is the display details of which button has been pressed.

Each button is attached to a GPIO pin (pins 12-14 on the Inky Pack) and can be created as a simple Pin object using the following code (this is for the button A on the Inky Pack).

pin1 = Pin(12,Pin.IN,Pin.PULL_UP)

To use interrupts, set the trigger and the callback handler function.

pin1.irq(trigger=Pin.IRQ_FALLING, handler=callback)

The callback function 
def callback(pin):

Supplies the Pin object to the code in the function.

Though the Pin object requires the pin id (in this case 12), it is not (currently 05/01/2023) possible to obtain the pin id from the Pin object directly.

However it is possible to check the equivalence of the supplied Pin against known pins:

def callback(pin):
    if(pin == pin1):
        print("Pin 1")

This means the same callback function can be used for all three pins, the equivalence check defines which pin is calling the callback function.

By using the code below, the following text is printed to the REPL console after the three buttons are pressed within the ten second cycle time of the loop and button B is pressed in the next loop.

cycle
Pin 1
Pin 2
Pin 3
cycle
Pin 2

Code

from machine import Pin
import time

# Set pins to the three buttons on the Inky Pack
pin1 = Pin(12,Pin.IN,Pin.PULL_UP)
pin2 = Pin(13,Pin.IN,Pin.PULL_UP)
pin3 = Pin(14,Pin.IN,Pin.PULL_UP)

# Define callback function for the interrupt
def callback(pin):
    if(pin == pin1):
        print("Pin 1")
    if(pin == pin2):
        print("Pin 2")
    if(pin == pin3):
        print("Pin 3")

# Set interrupt trigger and callback handler
pin1.irq(trigger=Pin.IRQ_FALLING, handler=callback)
pin2.irq(trigger=Pin.IRQ_FALLING, handler=callback)
pin3.irq(trigger=Pin.IRQ_FALLING, handler=callback)

# Infinite loop, every ten seconds it prints cycle.
while True:
    time.sleep(10)
    print("cycle")

References