Showing posts with label micro:bit. Show all posts

Sunday, 5 July 2020

Reading USB (Serial) data

Most microcontrollers have an option to output data over the USB link.

It is helpful during development to be able to read state information and other values that allow the developer to see what is happening.

The first thing is to identify which USB port is in use.
            foreach (string port in ports)
            {
                Console.WriteLine(port);
            }
For my set up, COM5 was the one in use.
using (var sp = new System.IO.Ports.SerialPort("COM5", 115200, System.IO.Ports.Parity.None, 8, System.IO.Ports.StopBits.One))
            {
                Console.WriteLine("Reading serial port");
                sp.Open();
                while (true)
                {
                    var readData = sp.ReadLine();
                    Console.WriteLine($"[{readData}]");
                }
            }
This will display on the console anything output from the device.


Sunday, 14 June 2020

BBC Micro:Bit Menu system (with persistent choice)

The BBC Micro:Bit is a simple microcontroller with a 5 x 5 matrix of LEDs, two buttons, 3D magnetic and acceleration sensors and a CPU temperature sensor.
The two buttons can make complicated interfaces rather difficult, however it is possible to build one.
One aadditional feature of this menu system is that your choices are persistent. If you select menu item, power off the Micro:Bit then subsequently power it back one, it will remember the choice (subject to it not being reflashed of course).

Code

This was written in Micropython using the Mu editor.
from microbit import *
import os
import utime
menuitem = 0
if 'choice.opt' in os.listdir():
    with open('choice.opt') as choice:
        menuitem = int(choice.read())
display.scroll("Menu item" + str(menuitem))
start = utime.ticks_ms()+6000
interval = 2000
while True:
    now = utime.ticks_ms()
    if start > now or now - start > interval:
        if menuitem == 0:
            temp = temperature()
            interval = 2000
            display.scroll(str(temp) + 'C', delay=100, wait=False)
        elif menuitem == 1:
            temp = temperature()
            interval = 2000
            display.scroll(str(temp + 273.15) + 'K', delay=100, wait=False)
        elif menuitem == 2:
            level = display.read_light_level()
            interval = 2000
            display.scroll(str(level) + ' light', delay=100, wait=False)
        elif menuitem == 3:
            level = compass.get_field_strength()
            interval = 6000
            display.scroll(str(level) + ' nTesla', delay=100, wait=False)
        elif menuitem == 4:
            display.scroll("Menu test")
        start = now 
    if button_a.is_pressed():
        display.scroll("Menu", delay = 100)
        sleep(50)
        while not button_a.is_pressed():
            display.set_pixel(4,menuitem,5)
            if button_b.is_pressed():
                display.set_pixel(4,menuitem,0)
                menuitem = menuitem + 1
                if menuitem > 4:
                    menuitem = 0
                with open('choice.opt','w') as choice:
                    choice.write(str(menuitem))
                display.scroll("Menu item" + str(menuitem), delay = 100)
            sleep(100)
            display.set_pixel(4,menuitem,5)
            sleep(100) 
    sleep(400)
The persistent choice is handled by this code:
menuitem = 0
if 'choice.opt' in os.listdir():
    with open('choice.opt') as choice:
        menuitem = int(choice.read())
The menu item is given a default value (0).
The file 'choice.opt' is checked if it exists in the directory list, if it is, then the value of the menu item is read from the file and assigned to the menuitem variable. When a subsequent decision is made to change the menuitem, this value is written out to the file, making it available the next time the Micro:Bit is switched on.

The main loop is entered after the start variable is set in advance of the current tick count and the display interval is set (strictly speaking the interval should be dependent on the menu choice but it only affects the first cycle).

Each loop, if the difference between the ticks now and the (loop) start ticks is greater than the interval, then the menuitem is used to choose what to do.
In this example it is used to choose which sensor is read and the results displayed.
Menu choices are:

  1. Temperature in degrees Celsius.
  2. Temperature in Kelvin
  3. Light level (based on the light falling on the LED matrix)
  4. Magnetic field strength in nanoTesla (using the compass module)
  5. A message.
The first three keep the interval at two seconds, but the magnetic field strength is a longer piece of text, so that is stretched to six seconds by setting the interval.
The Start ticks value is set to the Now value.

The next part of the code checks for the A button (left side) being pressed.
If so, it then loops until the button is pressed again.
Inside that loop, pressing the B (right hand) button increments the menuitem value, writes it to the file and shows a pixel on the right hand column indication which option is currently chosen.
Pressing button A exits the loop and recommences the outer infinite loop.

Disadvantages

This does mean that during normal operation, button A is not available. This might not be an issue but is something to bear in mind.

References


Saturday, 13 June 2020

Pimoroni Envirobit

Pimoroni Envirobit


The Pimoroni Envirobit is a set of sensors for the BBC Micro:Bit .


As you can see, it is equipped with a slot to take the Micro:Bit, so no soldering is required.

The Envirobit is fitted with the following sensors:

  • BME280 environmental sensor - which measures temperature, pressure, humidity and can calculate the altitude based on a supplied base pressure level (discuss).
  • tcs3472 RGB sensor - which measures Red Green and Blue light levels as well as “white” light levels. Also includes two illuminating (white) LEDs,
  • Sound - a small microphone allows the sound level to be measured on one of the Micro:Bit’s analogue pins

Assembly

Assembly is simple. Take the Envirobit board with the sensors facing forward, and insert the Micro:Bit with the LEDs also facing forward.
Due to the nature of the connection, you can swap the Microbits if the colour scheme does not match your needs.

Software

The main software support for the Envirobit is orientated towards the Microsoft MakeCode block based system.
There is some support for MicroPython. There is a GitHub link here: https://github.com/pimoroni/micropython-envirobit

There are three python files in the Library.
  • sound.py
  • bme280.py
  • tcs3472.py

The files can be transferred to your Micro:Bit using the Files function in Mu.

Sound

Contrary to the description on GitHub, this is not a class, just three methods.

  • sound.read() - This takes a reading of the sound level and returns a value between 0 and 440. There is an offset value in the code to set the minimum sensitivity.
  • sound.wait_for_double_clap() - listen for two high level sound events in a second, returns True if detected
  • sound.wait_for_clap() - listen for a single high sound level event in a second, returns True if detected

tcs3472

This uses a class to access the TCS3472 sensor via I2C.
To use the sensor, import the module (having transferred it to the Micro:Bit) and instantiate an instance.
import tcs3472
light_sensor = tcs3472.tcs3472() 
Methods:

  • r, g, b = light_sensor.rgb() - returns a tuple of the corrected levels of red, green and blue out of 255
  • r, g, b = light_sensor.scaled() - return a tuple of the amounts of red, green and blue on a scale of 0-1
  • level = light_sensor.light() - return a raw reading of light level on a scale of 0-65535
  • light_sensor.set_leds(0) - Turn the LEDs off
  • light_sensor.set_leds(1) - Turn the LEDs on

BME280

This uses a class to access the BME280 sensor via I2C.
The instructions on GitHub are incorrect, there is a missing () on the end of the class instantiation. Python can be very unforgiving if you make a mistake of this kind.
import bme280
bme = bme280.bme280()

The bme280 class has the following methods:

  • temp = bme.temperature() - return the temperature in degrees C
  • pressure = bme.pressure() - return the pressure in hectopascals
  • humidity = bme.humidity() - return the relative humidity in %
  • alt = bme.altitude() - return the altitude in feet, calculated against the current QNH value
  • bme.set_qnh(value) - set the QNH value for calculating altitude

QNH is the atmospheric pressure adjusted to sea level (what the pressure sensor should read at sea level).
https://en.wikipedia.org/wiki/QNH

References

https://github.com/pimoroni/micropython-envirobit
https://en.wikipedia.org/wiki/QNH


Sunday, 24 May 2020

Micro:bit Beacon - part 1: the beacon

One of the features of the Micro:Bit is its Bluetooth compatible radio.

Unfortunately, it is not available in Micropython due to the size of the Bluetooth software stack.

Whatt is available is a Radio object which uses the radio hardware to communicate between Micro:bits.

There is a neat program on the documentation site called Firefly. This has groups of Micro:bits communicating with each other.

Now this project uses the "flash" technique from the Firefly project.

from microbit import *
import radio
import utime
import machine

# "Flash" effect from the Firefly program
#https://microbit-micropython.readthedocs.io/en/latest/tutorials/radio.html?highlight=Firefly#fireflies
flash = [Image().invert()*(i/9) for i in range(9, -1, -1)]

# Obtain the machine id
machineID=machine.unique_id()

# Flash the display over a half second 
# and send the machine ID every second.
while True:
        display.show(flash, delay=50, wait=False)
        radio.on()
        radio.send(str(machineID))
        sleep(500)
        radio.off()
        sleep(500)


Sunday, 17 February 2019

Kitronik :MOVE mini for the BBC mIcro:bit

I ordered a Kitronik MOVE mini robot from Pimoroni last year. This provides a battery powered chassis that can be controlled using an on-board BBC micro:bit.
The kit comes in a robust cardboard box, unfortunately not big enough to take the completed robot (but see later).

The components are neatly bagged up, and include the required AA batteries.
The body is made up of laser cut acrylic pieces. There are two continuous rotation servo motors to provide the motive power.

The controller board is designed to use countersunk screws to provide the connection between the micro:bit  and the board. This does mean that it limits the control to the two motors and the light bar (there is an option to isolate the light bar, giving access to an additional - optional - servo).
The back of the board. Note at bottom right the area to  cut to access the third servo).
The kit does not include a BBC micro:bit. As one of the options is to control the robot's own micro:bit using a second micro:bit, I ordered a second one.

I covered the BBC micro:bit in an earlier post.


The instructions to build the robot can be found here. They are generally straightforward (so much so I forgot to pause to photograph the stages).

The one thing to be aware of is that the controller board only operates on the batteries. I started testing the board assuming that the USB supply would power the micro:bit and the controller board and was testing it with the battery switched off. The micro:bit was fine, but the ZIP LED light bar was not lighting up. Switching the battery pack on solved the problem.
As you can see, the micro:bit is screwed to the controlled board.  The ZIP LEDs are above the micro:bit and the 5x5 matrix is visible.

Side view. The robot has two wheels and uses the front and rear of the side walls as stabilising rails.
The ZIP LEDs are very bright.

Wednesday, 19 September 2018

MU Python, Micropython and CircuitPython editor

The Micro:bit can be programmed offline using the Mu editor. Until recently the editor available on the Raspbian repository has been an earlier version without support for the Radio module.

For a Raspberry Pi, Mu is now included in the Recommended Software option.

Instructions for installation are listed in the references.

References:

https://codewith.mu/
https://www.raspberrypi.org/blog/mu-python-ide/
https://projects.raspberrypi.org/en/projects/getting-started-with-mu

Sunday, 8 July 2018

Programming the BBC micro:bit

One of the simplest methods of programming the micro:bit is using the web based MakeCode by Microsoft.

Here is an example of a "Hello World" program written using MakeCode.

This is the code generated as Javascript.

basic.forever(() => {
    basic.showString("Hello World!")
})

References

BBC micro:bit

The BBC micro:bit is a pocket sized programmable micro-controller designed for use in education.

As part of an education programme, these were given to schoolchildren to be used to teach the principles of programming. They were designed to be compact in size but have an assortment of sensors and feedback devices and to spark the creativity of children to the potential of programming.

After the first distribution, they were made available commercially for all to use.
The commercial version is supplied in a cardboard box containing the micro:bit, a small instruction manual and a safety guide. Minimum additional equipment is required, a USB to micro USB data cable (not a charging cable) and a computer (Windows/Mac/Linux) with a browser.
 The rear of the micro:bit, showing the labelling. As you can see it has a Bluetooth Low Energy aerial, magnetometer (compass), accelerometer, micro USB power and data socket, battery connector and processor. It also shows the connectors.
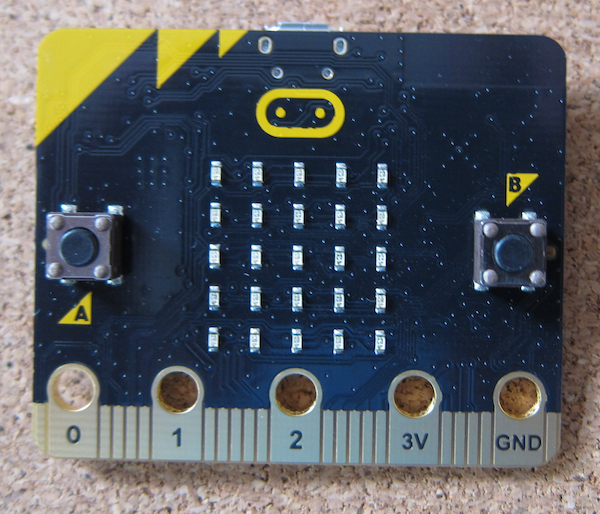
There are five big connectors suitable for crocodile clips, machine screws or conductive thread. On the front face they are labelled pins 0-2, 3V and Ground. Other pins are available through the edge connector. On this side is also the 5 x 5 LED display and two push buttons.

Reference