Showing posts with label Microsoft. Show all posts

Saturday, 3 April 2021

Delivering files to the Browser

Sometimes you want to embed files in a browser, such as images or PDF files.

With modern browsers it is easy to just add some HTML to display a file.

 <object data="documents/Hello World.pdf" type="application/pdf" width="100%" height="800px">

 <p>It appears you don't have a PDF plugin for this browser.</p>

</object>

The file to be displayed needs to be in a valid location on a web server, either the webserver delivering the page or an external one accessed with a full URL.

This is fine if you do not care that it potentially exposes your file structure.


If your webserver runs a scripting language it is possible to script the delivery of the file - the file does not have to be located in a similar location to the web server files, nor does it need to be accessible by HTTP (though it can be but hidden on a SharePoint or cloud location).


The following uses ASP.NET Core to build a RESTFul interface to deliver selected files on receipt of a request.

If you have not built a Web API project before, it is worth running through the tutorial here (https://docs.microsoft.com/en-us/aspnet/core/tutorials/first-web-api?view=aspnetcore-5.0&tabs=visual-studio).

Web API to deliver selected files

This Web API uses a RESTFul interface to request a file, the file request is included within the URL, and in this case is just an integer.

Requests to the Web API have the form:

http://<domanin name>/getpdf/<file id>

The test web page builds on the HTML above, the data attribute containing the RESTFul URL to select the files.

<object data="https://localhost:44310/getpdf/0" type="application/pdf" width="100%" height="800px">

 <p>It appears you don't have a PDF plugin for this browser.</p>

</object>


GetPDFController.cs

The following code is for a controller (additional  code is required, use the set up from the tutorial).

using Microsoft.AspNetCore.Mvc;

using Microsoft.Extensions.Logging;

using System;

/// <summary>

/// Web App controller

/// Controller for RESTful access to PDFs

/// The last part of the URL is an integer that selects a specific PDF

/// https://&lt;host&gt;/getpdf/&lt;pdfID&gt;

/// </summary>

namespace GetPDF.Controllers

{

    [ApiController]

    [Route("[controller]")]

    public class GetPDFController : ControllerBase

    {

        private readonly ILogger<GetPDFController> _logger;


        public GetPDFController(ILogger<GetPDFController> logger)

        {

            _logger = logger;

        }


        /// <summary>

        /// Returns a PDF selected by <paramref name="pdfID"/

        /// THis example uses a simple switch to select the PDF,

        /// in a real application this might be search parameters or 

        /// >multiple values that build into the file path

        /// 

        /// Additionally, in a real application there would be a 

        /// requirement for the authentication of the requester.

        /// Additionally the PDF could be watermarked before being

        /// sent.

        /// </summary>

        /// <param name="pdfID">PDF identifier</param>

        /// <returns>PDF or 404</returns>

        [HttpGet]

        [Route("{pdfID:int}")]

        public IActionResult Get(int pdfID)

        {

            string filename;

            // This is for demonstration purposes only.

            // This would require a more complicated solution

            switch (pdfID)

            {

                case 0:

                    filename = @"C:\inetpub\wwwroot\documents\file-0.pdf";

                    return new PhysicalFileResult(filename, "application/pdf");

                case 1:

                    filename = @"C:\inetpub\wwwroot\documents\file-1.pdf";

                    return new PhysicalFileResult(filename, "application/pdf");

               default:

                    return NotFound();

            }


        }

    }

}

References

https://en.wikipedia.org/wiki/ASP.NET_Core

https://docs.microsoft.com/en-us/aspnet/core/tutorials/first-web-api?view=aspnetcore-5.0&tabs=visual-studio

https://docs.microsoft.com/en-us/aspnet/core/web-api/action-return-types?view=aspnetcore-5.0

https://docs.microsoft.com/en-us/dotnet/api/microsoft.aspnetcore.mvc.physicalfileresult?view=aspnetcore-5.0


Saturday, 27 March 2021

Developing Linux programs in Visual Studio C++

 Developing Linux programs in Visual Studio C++

Though Raspberry PIs (and other Linux based machines) are well supported with development environments, the familiar Windows based Visual Studio does make it easier to develop applications, especially where the target machine is not particularly powerful.

The following uses the free Visual Studio Microsoft Visual Studio Community 2019 Version 16.9.2.

Set Up

Start the Visual Studio Installer from the Start button or by searching.


Update Visual Studio.

Once it has been updated, click on the Modify button (not quite as obvious as it could be).

Select the Linux C++ option (you need to scroll down a bit).


Click on the Modify button (bottom right).

Set up Linux machine

sudo apt-get install openssh-server g++ gdb make ninja-build rsync zip

Start SSH on the Linux machine (if not already started).

sudo service ssh start

First project

Start Visual Studio. Click File/New Project.

Search for Linux templates.

Start with a Console Application, suitable for any Linux machine.

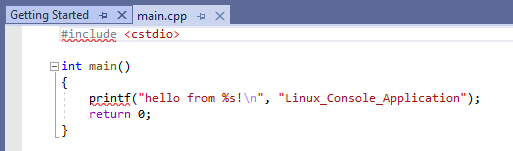
This provides a bare bones “Hello World” C++ project.


Click on Build/Rebuild Project.

Visual Studio will ask for the Linux machines hostname,  username and password. The username and password should be a login on the Linux machine. Ensure that the Linux machine is configured to allow SSH through the firewall (see Simple Firewall oSimple Firewall r the Raspberry Pi Config program).

On the Linux machine you will find a folder called projects in the user folder. See below. 

Open a terminal on the Linux machine and change directory to this location.

To run the program enter.

./"Linux Console Application.out"

References

https://docs.microsoft.com/en-us/cpp/linux/download-install-and-setup-the-linux-development-workload?view=msvc-160

https://docs.microsoft.com/en-us/cpp/linux/create-a-new-linux-project?view=msvc-160


Friday, 11 December 2020

C# Threads and Events

Background

For those of you who remember Visual Basic, that was a time when you generally did not need to worry too much about threads and the user interface. When you pressed a button, the display would update based on what was happening (you might need to add some code to update the interface, but that was just a simple statement). Migrating to Visual Basic.NET came as a bit of a shock, when you clicked on a button, the code behind it hogged the resources and the display would freeze (and in extreme cases through up a warning about needing to be pumped or something).

This was because the user interface was under the programs control, and by default the thread that ran the UI was also the thread that ran the code behind your button.

This was fine for simple programs that did something with no user interaction (you set it up, pressed the go button, it did what it was supposed - sometimes - to do and returned a result). It was easier on the user than command line, but there was little feedback (no progress bars etc.).

For that you needed to venture into Threads. Threads appear to be similar to a processor running your code. You have the thread created to run your program, if it is busy calculating something, it does not have time to do anything else. If you want your user interface to show progress or allow you to stop your calculation, you need to create and run your calculation in another thread.

Originally Visual Studio provided a very limited framework to use threads - you could:

  • Create a thread based on a method on an instance of an object
  • Start a thread
  • Check if it was running

Everything else you had to roll yourself. This is where Events came in.

The Event is part of the Object Orientated Programming model. An object provides Events that other objects (code) can listen out for and respond to. It provides a richer collection of options than the Interrupt model used in single thread processors, not only signalling for an interaction but passing complex data. Additionally, multiple threads can listen for the same event.

In C# there is a slight problem - the user interface thread is solely responsible for (oddly enough) the user interface, but the event response is on a separate thread. This means that any events destined for the user interface has to be sent through a delegate which invokes the call on the user interface thread.

Thread handling has been improved over time, there are now background worker threads which handle a lot of the hard work involved but do not offer the full flexibility of controlling your threads and events directly.

The following describes a test program and the required code. Some of it could have been dealt with using background worker threads.

Form

The form uses the following controls:

  • •Tool Strip (located at the top)
  • •Add a Tool Strip label, set the text to “Threads”
  • •Add a Tool Strip Combo Box. Set the text to 1, add items (one per line) 1, 2, 5, 10
  • •Add a button to the Tool Strip, set the text to “Start” and the DisplayType to Text
  • •Status Strip (located at the bottom). Remember to set ShowItemToolTip to true
  • •Panel – located between the tool strip and the status strip. Set Dock to Fill.
  • •Split Container – added to the Panel.
  • •Text Box named txtMessage added to the right hand split panel, Multi-Line, Vertical Scroll Bar and Dock set to Fill


Code

using System;
using System.Threading;
using System.Windows.Forms;

namespace eventtest
{
    public partial class Form1 : Form
    {
        public Form1()
        {
            InitializeComponent();
        }

        // Array for instances of the Worker class
        private Worker[] workers;

        // Array for the matching threads
        private Thread[] workerThreads;

        private void toolStripButton1_Click(object sender, EventArgs e)
        {
            // get the number of threads from the combo box 
            int threads = int.Parse(tsbThreads.Text);

            // Create the progress bars for the number of threads
            CreateProgress(threads);

            // Resize the arrays
            workers = new Worker[threads];
            workerThreads = new Thread[threads];

            // for each intended thread
            for (int ix = 0; ix < threads; ix++)
            {
                // Create a new Worker instance
                workers[ix] = new Worker(ix, 30);
                // Create a new thread
                workerThreads[ix] = new Thread(workers[ix].Start);

                // Connect the events to the event handlers
                workers[ix].ProcessProgress += HandleProgress;
                workers[ix].ProcessComplete += HandleComplete;
            }

            // Start each thread in turn
            for (int ix = 0; ix < threads; ix++)
            {
                workerThreads[ix].Start();
            }
        }

        // Event handler for a thread reaching completion
        private void HandleComplete(object sender, CompleteEventArgs e)
        {
            SetComplete(e);
        }

        // Delegate for SetComplete
        private delegate void SetCompleteDelegate(CompleteEventArgs e);

        // If the call to this method is not on the UI thread, invoke it 
        private void SetComplete(CompleteEventArgs e)
        {
            // Check if this call is not on the UI thread
            if (txtMessages.InvokeRequired)
            {
                // Invoke the delegate 
                var d = new SetCompleteDelegate(SetComplete);
                Invoke(d, new object[] { e });
            }
            else
            {
                // Add the message to the message text box
                txtMessages.Text = $"{txtMessages.Text}Thread {e.ID} {e.Message} {Environment.NewLine}";
            }
        }

        // Event handling for thread progress
        private void HandleProgress(object sender, ProgressEventArgs e)
        {
            SetProgress(e);
        }

        // Delegate for SetProgress
        private delegate void SetProgressDelegate(ProgressEventArgs e);

        // If the call to this method is not on the UI thread, invoke it 
        private void SetProgress(ProgressEventArgs e)
        {
            // Check if this call is not on the UI thread
            if (txtMessages.InvokeRequired)
            {
                // Invoke the delegate
                var d = new SetProgressDelegate(SetProgress);
                Invoke(d, new object[] { e });
            }
            else
            {
                // Find the progress trip for updating
                var x = (ToolStripProgressBar)statusStrip1.Items[$"Progress{e.ID.ToString("000")}"];
                // Set the percentage
                x.Value = e.Percentage;
                // Set the tool tip
                x.ToolTipText = e.Message;
            }
        }
            private void CreateProgress(int Threads)
        {
            // Clear all existing status strip items
            statusStrip1.Items.Clear();

            // For each thread
            for (int ix = 0; ix < Threads; ix++)
            {
                // Create a tool strip progress bar
                ToolStripProgressBar newItem = new ToolStripProgressBar($"Progress{ix.ToString("000")}");
                // Set the minimum and maximum values - this will be the percentage completion
                newItem.Minimum = 0;
                newItem.Maximum = 100;
                // Add the progress bar to the status strip
                statusStrip1.Items.Add(newItem);
            }
        }
    }

    // This class is a test class to show how progress and completion events can be passed to the UI
    public class Worker
    {
        // Thread ID
        private int ID;

        // Count items
        private int Things;
        public Worker(int id, int things)
        {
            ID = id;
            Things = things;
        }

        // Start the processing
        public void Start()
        {
            // This example just runs through a number of cycles with a set period wait
            // and raises an event each cycle showing the progress
            for (int ix = 1; ix <= Things; ix++)
            {
                Thread.Sleep(500);

                // Raise an event
                Progress(new ProgressEventArgs(ID, (ix*100)/Things, $"{(ix * 100) / Things}%"));
            }
            // Raise an event indicating the thread has completed
            Complete(new CompleteEventArgs(ID, "Process complete"));
        }

        // Raise an event showing progress, passing a ProgressEventArgs object
        protected virtual void Progress(ProgressEventArgs e)
        {
            EventHandler<ProgressEventArgs> handler = ProcessProgress;
            if (handler != null)
            {
                handler(this, e);
            }
        }

        // Raise an event indicating the process has completed
        protected void Complete(CompleteEventArgs e)
        {
            EventHandler<CompleteEventArgs> handler = ProcessComplete;
            if (handler != null)
            {
                handler(this, e);
            }
        }

        // Public event definition
        public event EventHandler<ProgressEventArgs> ProcessProgress;
        public event EventHandler<CompleteEventArgs> ProcessComplete;

    }

    // Process completion argument object
    public class CompleteEventArgs : EventArgs
    {
        // Thread ID raising the event
        public int ID;
        // Completion message
        public string Message;

        // Constructor
        public CompleteEventArgs(int id, string message)
        {
            ID = id;
            Message = message;
        }
    }

    // Process Progress argument object
    public class ProgressEventArgs : EventArgs
    {
        // Thread ID that raised the event
        public int ID;
        // Process percentage
        public int Percentage { get; set; }
        // Process message
        public string Message { get; set; }

        // Constructor for progress argument
        public ProgressEventArgs(int id,int percentage, string message)
        {
            ID = id;
            Percentage = percentage;
            Message = message;
        }
    }
}

Results

When the program runs, the form is displayed. Select the number of threads from the drop down list (or type it in) Click on Start.


This program is running with five threads. There are five progress bars, and the hover over tells you the percentage. Note that the form needed to be widened to display the five progress bars, they have a default width and the original width only displays four of the bars.

Setting the progress bars width such that all are displayed is left as an exercise for the reader (remember the bars will need to be resized if the enclosing form is resized).


Sunday, 27 September 2020

Microsoft SQL Server – first steps

Set Up

A free Developer edition of Microsoft SQL server is available from the Microsoft site.

As Microsoft change their site and methods regularly, it is probably best to follow their instructions.

It is worth getting the Microsoft SQL Management Studio at the same time as it does make a lot of the set up a lot easier.

The following will assume you have Visual Studio 2019 (Developer edition), SQL Server Express and the SQL Server Management Studio installed.

For simplicity, it is assumed that you are logged in with Windows Authentication, if not, you will need to add username and password to the database to allow access.

Also, ensure that you have set the System Administrator password in SQLServer.

My First Database

Just to be clear, this is not setting up a production database, and certainly not one ready to face a hostile world.

Start the SQL Server Management Studio (SSMS from here).

The object explorer on the left-hand side shows what it can see. 

Select the Databases node. If this is your first database, you will probably find that there is just a System Databases node inside.

You can create a database simply by right clicking on Databases and using the defaults.

This is not how databases should be created, you should have a plan written down and decide where all the files should be located. You should also consider how big the database will be initially and how the database is going to grow. Does the database need to have an upper size limit and when it grows, how much will it grow by. These can have a dramatic effect on performance (and also identify when there is a problem).

However, for this case, the defaults will be fine. Add your user as a SQLServer user via permissions – we will use Integrated Security later – this means your login is used to log in to the database.

My First Table

Efficient table design is important, you should as part of your design have considered what data you are storing, and how the data will accessed, updated and possibly deleted.

There is a process called data normalisation – for efficient storage, you should only store the information once, however it might be that in normal usage, you need certain pieces of data together, so it might be worth keeping them in the same table.

This is just about setting up a simple table, so we will initially use the SSMS to create the table.

If you click on the node for the database you created earlier it will display various nodes such as Tables, Views, Programmability etc.

Clicking on the Tables node will show you the System Tables node and possibly a File Tables node. Right click on the Tables node and select Tables.

The first data column will be an ID or Identity column. This will be an Integer (sufficient for this example). In the properties you want it not to be able to be Null, and you need to scroll down to the Identity Specification. Set that to Yes and then you can set the Is Identity field to Yes.

An Identity column is automatically filled with a value that is incremented (by default by one – there is a setting for that). It can be used to Identify the row.

The next column (Name) is a VARCHAR. This will default to 50, but 20 will be sufficient. Set that to not Null as well.

The last column is Description. This is a Text column (the contents of Text columns are not stored in the database table, there is a managed table that holds the text information. This makes the text column type efficient to store large amounts of text but at the disadvantage that the database has to be accessed at least twice, – first to get the original row that contains the reference, and second to get the text).

Viewing your data

For this, you can create a new Query Window in SSMS.

The following SQL statement will select all the contents of the table SimpleNameDescription owned by DBO in the database Testdatabase.

select * from Testdatabase.dbo.SimpleNameDescription;

Disappointingly there is no data in the database at the moment.

That is easily fixed

My First Row

Open another Query window and use the following SQL statement:

insert into [dbo].[SimpleNameDescription] ([name],[description]) values ('First one','This is the first record');

This inserts a record into the database table, setting the fields name and description to have the values listed. Note there is no mention of the ID field. The database, table and field names are enclosed in square brackets to identify they are database, table and field names.

Run the select statement from earlier (that is why a second query window was used for the insert).

Note the ID is 1. When you insert the next record, the ID will be 2. This is the great advantage of using an identity, it handles the value itself.

Using the same insert statement, add a couple of additional rows and then use the select statement to view your handiwork.

Changing a row

You have added a number of rows, but you made a mistake on one of them, how do you fix it?

SQL statements can have a Where Clause, this can be used to identify a subset of the rows in the table. Now luckily (or by good design) we have a column that identifies the rows, so we can update a specific row.

UPDATE [dbo].[SimpleNameDescription]   SET [Description] = 'new description' WHERE id = 2;

This will change the description on the row with ID of 2.

Deleting a row

Add a row using:

insert into [dbo].[SimpleNameDescription] ([name],[description]) values ('rubbish','This is rubbish');

Now as it says, this is rubbish, so you want to remove it. Use the select statement above to find the ID number

Open another query window

And add the following:

DELETE FROM [dbo].[SimpleNameDescription] WHERE id = 3;

The value 3 needs to be replaced with the ID of the row of the row you want to delete.

Run the SQL and then run the select. That row has gone. Note, that if you run the delete without the Where clause, it will delete everything and unless you have backed it up, it is gone for good. Be warned.


Programmability

Stored procedures

It is possible to build incredibly complicated systems using the SQL statements, but it has a number of security and maintenance issues. This is where Stored Procedures come in handy. These are SQL statements that can be reused.

This is a simple Stored Procedure:

SET ANSI_NULLS ON
GO
SET QUOTED_IDENTIFIER ON
GO
CREATE PROCEDURE Test @ID int
AS
BEGIN
select * from Testdatabase.dbo.SimpleNameDescription where id=@id;
END
GO

To execute the stored procedure open another query window:

USE [Testdatabase]
GO
[dbo].Test   2;
GO

Accessing the database in C#

The following assumes you have logged in via Windows Authentication and your Windows Login has access to the database.

First you need to determine your SQL log in string.

string connectionString= "Server=localhost\\SQLExpress;database=Testdatabase;Integrated Security=true;;";

The SQL server name is your machine (localhost) and is called SQLExpress. The database is named, and it states that it will use Integrated Security. The latter hands off the heavy lifting of user names and passwords to the Windows Login. If you need to use username and passwords, replace the Integrated security with 

user Id=UserName; Password=Secret;

The overall code is:

       static void Main(string[] args)
        {
            Console.WriteLine("Connecting...");
            string connectionString= "Server=localhost\\SQLExpress;database=Testdatabase;Integrated Security=true;;";
            using (SqlConnection connection = new SqlConnection(connectionString))
            {
                string sql = " SELECT *  FROM [dbo].[SimpleNameDescription]";
                SqlCommand command = new SqlCommand(sql, connection);
                connection.Open();
                SqlDataReader reader = command.ExecuteReader();
                while (reader.Read())
                {
                    Console.WriteLine($"{reader.GetInt32(0)} {reader.GetString(1)} - {reader.GetString(2)}");
                }
                reader.Close();
            }
            Console.Write("Press any key");
            Console.ReadKey();
        }

This will display all the rows in the table SimpleNameDescription.

Now that is fine if you want to execute non selective command, but what if you want to only read for a particular ID?

 SQL Command Parameters

Though it is possible to cobble together your SQL statement, it is better to use parameters.

        static void test2(int id)
        {
            Console.WriteLine("Connecting...");
            using (SqlConnection connection = new SqlConnection(connectionString))
            {
                string sql = " SELECT *  FROM [dbo].[SimpleNameDescription] where id=@id";
                SqlCommand command = new SqlCommand(sql, connection);
                command.Parameters.AddWithValue("@ID", id);
                connection.Open();
                SqlDataReader reader = command.ExecuteReader();
                while (reader.Read())
                {
                    Console.WriteLine($"{reader.GetInt32(0)} {reader.GetString(1)} - {reader.GetString(2)}");
                }
                reader.Close();
            }
        }

Of course, as mentioned above, it is better to use stored procedures.

It is important to set the CommandType, otherwise the stored procedure will not be able to see the 

        static void test3(int id)
        {
            Console.WriteLine("Connecting...");
            using (SqlConnection connection = new SqlConnection(connectionString))
            {
                string sql = "[dbo].[Test]";
                SqlCommand command = new SqlCommand(sql, connection);
                command.CommandType = CommandType.StoredProcedure;
                command.Parameters.AddWithValue("@ID", id);
                connection.Open();
                SqlDataReader reader = command.ExecuteReader();
                while (reader.Read())
                {
                    Console.WriteLine($"{reader.GetInt32(0)} {reader.GetString(1)} - {reader.GetString(2)}");
                }
                reader.Close();
            }
        }

References

https://www.microsoft.com/en-gb/sql-server/sql-server-downloads

https://docs.microsoft.com/en-us/dotnet/api/system.data.sqlclient.sqldatareader?view=netframework-4.7.2

https://www.connectionstrings.com/sqlconnection/

https://stackoverflow.com/questions/12220865/connecting-to-local-sql-server-database-using-c-sharp


Friday, 27 December 2019

My First ASP Page

ASP or Active Server Pages was a Microsoft web service in the early days of dynamic web pages. Though generally no longer a cutting edge technology, it is still used in a surprisingly large number of web sites.

Setup

Most Windows computers can host Internet Information Services (IIS). It is not installed by default but can be activated using the "Turn Windows features on or off" dialogue box. You can get to that either through the Control Panel application or by searching for it.


You will need to select down to the optional features to activate the ASP option.

By default ASP expects VBScript to be the default server side language, this can be changed when you start IIS.

ECMAScript is a synonym for Javascript or Jscript.
To make life easier for debugging, you can set "Send Errors To Browser" to true. This sends informative error messages rather than "This is broke". You do not want to have this set in a live environment as it makes your site extremely vulnerable to attack.

Hello World

This is a simple ASP page:
<!DOCTYPE html PUBLIC "-//W3C//DTD XHTML 1.0 Strict//EN" "http://www.w3.org/TR/xhtml1/DTD/xhtml1-strict.dtd">
<html xmlns="http://www.w3.org/1999/xhtml">
    <head>
     <meta http-equiv="Content-Type" content="text/html; charset=iso-8859-1" />
     <title>ASP Test page</title>
    </head>
    <body>
     <h1>Hello World</h1>
    </body>
</html>

So far, so HTML.

What you can do is run code at the server rather than just serve up a fixed page.

Hello World .ASP

The difference between a static HTML page and an ASP page is the Active part.
To define code that will run on the server, you need to put it between <% %>.
You can also include other files within your page. This is very useful as you can define standard parts of your web site in one location, and then reuse them on different pages.
For this you use the #include command inside HTML comments:

<!-- #include file="include-filename.asp" -->

The timeline of inclusion is that the included files are added to the file before any code is executed, so it is not possible to conditionally include file content - this does not work:

<% if(condition){%>
<!-- #include file="this-file.asp" -->
<% } %>

Remember this, otherwise you will get annoyed with it.

The first "active" ASP page will extend the previous example to print out the time.

<!DOCTYPE html PUBLIC "-//W3C//DTD XHTML 1.0 Strict//EN" "http://www.w3.org/TR/xhtml1/DTD/xhtml1-strict.dtd">
<html xmlns="http://www.w3.org/1999/xhtml">
    <head>
        <meta http-equiv="Content-Type" content="text/html; charset=iso-8859-1" />
        <title>ASP Hello World page</title>
    </head>
    <body>
        <h1>Hello World</h1>
        <p>It is <%t=Date();
            Response.Write(t);
            %></p>
    </body>
</html>

When you first go to this page, it will display the current time. When you refresh the page, it will have the new (current) time.

The Response.Write  adds the parameter content to the page content (similar to a print or console.write command). It is possible to shorten a Response.Write(x) to <%=x%>.

Hello You

Now the previous example did make the page more dynamic, but does not really make it interactive.

For that we need two new ideas:

The Form.

A form is a block of HTML. If there is a Submit button, any selected, entered or clicked values are sent back to the web address identified by the action attribute. If no address is provided, the values are sent back to the address of the page. 

The page with the form does not need to be an ASP page, for that matter neither does the target page - however the target page does need to be one that can make use of the information being sent.

This form is simple and made up of four parts:
  • An enclosing form tag, it has an empty action attribute as it will be sending the data back to itself.
  • A text label asking you to enter your name.
  • An input of type text box for you to enter your name. It has a name attribute to identify it when it is sent. It also has a value attribute. It might seem counter-intuitive to give it a value as it is an input, but this will also put your entered name in the box after you send it (just in case you made a mistake). 
  • An input of type Submit. This has a value that will be displayed on the button. This sends the information to the address in the form's action attribute.

The Request object. 

The Request object contains all the assorted stuff that is being sent to the web page (such as the information being entered on the form).

In this case we will be asking it for the value of the myname parameter, which is supplied by the tag with the name attribute "myname". If no parameter is supplied, the value of Request("myname") is an empty string.

<!DOCTYPE html PUBLIC "-//W3C//DTD XHTML 1.0 Strict//EN" "http://www.w3.org/TR/xhtml1/DTD/xhtml1-strict.dtd">
<html xmlns="http://www.w3.org/1999/xhtml">
    <head>
        <meta http-equiv="Content-Type" content="text/html; charset=iso-8859-1" />
        <title>ASP Form test page</title>
    </head>
    <body>
        <h1>Hello 
            <%
            personName = Request("myname");
            if(personName!=""){
                Response.Write(personName)
            }
            %>
        </h1>
        <form action="">
            Please enter your name: <input type="text" name="myname" value="<%=personName%>" />
            <input type="submit" value="Enter" name="go" />
        </form>
    </body>
</html>

When you first visit the page it will say Hello, and ask for your name.

When you enter your name and click on Enter, the display will change to say Hello <your name>, it will also add your name into the input text box.

You will also notice the URL will have changed to include the name and values of the parameters (the elements within the form):
http://localhost/form.asp?myname=Fred&go=Enter
You can actually tailor the parameters in the address bar of the browser, try changing Fred to Ned.
This can be useful, but it does rather expose the workings of your cunningly crafted web site.

This is because the default behaviour of the form tag is to use the method "GET". This does have some advantages, you can see that it is working, and you can edit the input in the address bar (great while testing). The disadvantages are that it can look messy, and that the parameters are on display and are limited by length.

The alternative is the method "POST". This packages up the parameters' names and values and sends it separately from the address.

Change the form tag's attributes to include a method = "POST" attribute:
<form action="" method="POST">
Save and refresh your page in your browser.
The problem is that you can enter the new name, but it continues to display the old one. This is because the address includes the existing (GET) parameters, and it overrides POST parameters.
Clear the existing information from the address, and it will behave as you expect.

It is important to be aware that a value sent via GET will override a value sent by POST.

There is a way round that, but that is for a second post.


Sunday, 8 July 2018

Programming the BBC micro:bit

One of the simplest methods of programming the micro:bit is using the web based MakeCode by Microsoft.

Here is an example of a "Hello World" program written using MakeCode.

This is the code generated as Javascript.

basic.forever(() => {
    basic.showString("Hello World!")
})

References