By default the Raspberry Pi will channel sound through the HDMI connection to a suitable television/monitor.
Most of the time that will work automatically (if it thinks the television/monitor is not equipped with a speaker or speakers, it routes it through the headphone socket).
The key thing is the "sometime".
Some television/monitors do not appear to tell the Raspberry Pi they have a speaker. This may be due to the monitor, or due to the HDMI cable in use.
The easiest way of forcing the sound to be output via one of the channels is to right click on the loudspeaker icon. The drop down will show available audio output devices, the tick indicating the selected one. Make your choice there.
You can also use the command line:
amixer cset numid=3 2
The parameter 2 sets output to HDMI, 1 sets it to the headphone socket and 0 sets it to default.
It is also possible using the configuration screen and by editing the /boot/config.txt file. See the reference for details.
References:
https://www.raspberrypi.org/documentation/configuration/audio-config.md
Monday, 15 October 2018
Wednesday, 19 September 2018
CircuitPython: writing to the file system.
Circuitpython has a very easy way of uploading code and data to the microcontroller, the microcontroller's storage appears as a USB storage device on the host's operating system. To move code and data to the microcontroller, you simply copy everything to the volume.
Unfortunately this does mean that, by default, Circuitpython cannot write data to its own storage (it is read only) and so it cannot write data that will visible to the host.
However it is possible to change that in the optional boot.py code file.
The boot.py file is only run on the first boot of the device (power up) and not when REPL is restarted or when you save a file. The microcontroller needs to be Ejected as a USB device and the reset button pressed.
Note: When you change it from read only, it is not possible to update the code on the microcontroller - including the boot.py.
The boot.py file needs to contain the following code:
import storage
storage.remount("/", False)
The first line imports the storage module, allowing access to OS functions.
The second line remounts the storage with readonly set to false.
The boot.py file can be "removed" via REPL (Read - Evaluate - Print - Loop). This is very like a command line interface combined with an (xPython) interpretor.
To access REPL on Mu:
Click on the Serial button on the ribbon. This will open a serial connection to the connected microcontroller.
Press CTRL-C (keyboard interrupt) to stop CircuitPython from continuing with whatever it is doing.
Press any key (as instructed).
Use the REPL.
To remove the boot.py, you need to rename the file via REPL:
import os
os.listdir("/")
os.rename("/boot.py", "/boot.bak")
The first line imports the storage module, allowing access to OS functions.
The second lists the contents of the root of the microcontoller's storage.
The third renames the boot.py file to boot.bak.
The microcontroller needs to be ejected (as a USB device) and the reset button pressed (physically unplugging it after ejecting it will also work).
https://learn.adafruit.com/cpu-temperature-logging-with-circuit-python/writing-to-the-filesystem
https://circuitpython.readthedocs.io/en/2.x/shared-bindings/storage/__init__.html
Unfortunately this does mean that, by default, Circuitpython cannot write data to its own storage (it is read only) and so it cannot write data that will visible to the host.
However it is possible to change that in the optional boot.py code file.
The boot.py file is only run on the first boot of the device (power up) and not when REPL is restarted or when you save a file. The microcontroller needs to be Ejected as a USB device and the reset button pressed.
Note: When you change it from read only, it is not possible to update the code on the microcontroller - including the boot.py.
The boot.py file needs to contain the following code:
import storage
storage.remount("/", False)
The first line imports the storage module, allowing access to OS functions.
The second line remounts the storage with readonly set to false.
The boot.py file can be "removed" via REPL (Read - Evaluate - Print - Loop). This is very like a command line interface combined with an (xPython) interpretor.
To access REPL on Mu:
Click on the Serial button on the ribbon. This will open a serial connection to the connected microcontroller.
Press CTRL-C (keyboard interrupt) to stop CircuitPython from continuing with whatever it is doing.
Press any key (as instructed).
Use the REPL.
To remove the boot.py, you need to rename the file via REPL:
import os
os.listdir("/")
os.rename("/boot.py", "/boot.bak")
The first line imports the storage module, allowing access to OS functions.
The second lists the contents of the root of the microcontoller's storage.
The third renames the boot.py file to boot.bak.
The microcontroller needs to be ejected (as a USB device) and the reset button pressed (physically unplugging it after ejecting it will also work).
References
https://codewith.mu/en/tutorials/1.0/replhttps://learn.adafruit.com/cpu-temperature-logging-with-circuit-python/writing-to-the-filesystem
https://circuitpython.readthedocs.io/en/2.x/shared-bindings/storage/__init__.html

MU Python, Micropython and CircuitPython editor
The Micro:bit can be programmed offline using the Mu editor. Until recently the editor available on the Raspbian repository has been an earlier version without support for the Radio module.
For a Raspberry Pi, Mu is now included in the Recommended Software option.
Instructions for installation are listed in the references.
https://www.raspberrypi.org/blog/mu-python-ide/
https://projects.raspberrypi.org/en/projects/getting-started-with-mu
For a Raspberry Pi, Mu is now included in the Recommended Software option.
Instructions for installation are listed in the references.
References:
https://codewith.mu/https://www.raspberrypi.org/blog/mu-python-ide/
https://projects.raspberrypi.org/en/projects/getting-started-with-mu
Monday, 13 August 2018
Future Learn
FutureLearn is a Massive Open Online Course Platform. The courses are developed by partner organisations and can be studied using a mobile or tablet computer (although some courses may require additional technology - such as a piano for the Jazz Piano course).
FutureLearn was created by The Open University and (originally) twelve partner universities to provide on-line courses. Over the five plus years it has been in existence, the partners count has increased to 141.
The courses cover a wide area of study, technology, medicine, anthropology, marketing, arts, humanities, languages, music etc.
The courses are free, but access is for a limited amount of time. To extend access indefinitely and to receive a certificate of study requires a payment. A number of the courses are modules from a larger course including degree courses.
FutureLearn was created by The Open University and (originally) twelve partner universities to provide on-line courses. Over the five plus years it has been in existence, the partners count has increased to 141.
The courses cover a wide area of study, technology, medicine, anthropology, marketing, arts, humanities, languages, music etc.
The courses are free, but access is for a limited amount of time. To extend access indefinitely and to receive a certificate of study requires a payment. A number of the courses are modules from a larger course including degree courses.
References:
Thursday, 12 July 2018
Plotting temperature over time on a Raspberry Pi
A while back I assembled a temperature measuring system using a DS18B20 temperature sensor which was read by an Arduino fitted with an Ethernet Shield.


To record the temperature over time, I wrote a simple Python program running on a Raspberry Pi 3 to access the Arduino over my local network.
It was not the most elegant of programs, but it recorded the time and temperature into a CSV file.
The CSV file was then opened in Libre Calc, and the results plotted out.


To record the temperature over time, I wrote a simple Python program running on a Raspberry Pi 3 to access the Arduino over my local network.
It was not the most elegant of programs, but it recorded the time and temperature into a CSV file.
The CSV file was then opened in Libre Calc, and the results plotted out.

Sunday, 8 July 2018
Programming the BBC micro:bit
One of the simplest methods of programming the micro:bit is using the web based MakeCode by Microsoft.
Here is an example of a "Hello World" program written using MakeCode.
This is the code generated as Javascript.
basic.forever(() => {
basic.showString("Hello World!")
})
References
Here is an example of a "Hello World" program written using MakeCode.
This is the code generated as Javascript.
basic.forever(() => {
basic.showString("Hello World!")
})
References
BBC micro:bit
The BBC micro:bit is a pocket sized programmable micro-controller designed for use in education.
As part of an education programme, these were given to schoolchildren to be used to teach the principles of programming. They were designed to be compact in size but have an assortment of sensors and feedback devices and to spark the creativity of children to the potential of programming.
After the first distribution, they were made available commercially for all to use.
 The commercial version is supplied in a cardboard box containing the micro:bit, a small instruction manual and a safety guide. Minimum additional equipment is required, a USB to micro USB data cable (not a charging cable) and a computer (Windows/Mac/Linux) with a browser.
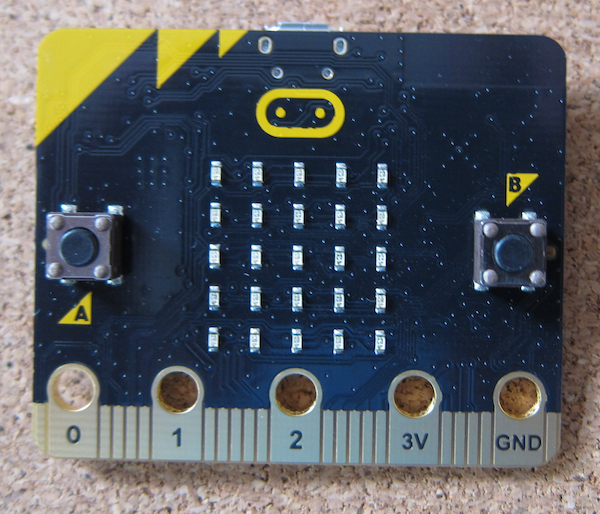
 The rear of the micro:bit, showing the labelling. As you can see it has a Bluetooth Low Energy aerial, magnetometer (compass), accelerometer, micro USB power and data socket, battery connector and processor. It also shows the connectors.
 There are five big connectors suitable for crocodile clips, machine screws or conductive thread. On the front face they are labelled pins 0-2, 3V and Ground. Other pins are available through the edge connector. On this side is also the 5 x 5 LED display and two push buttons.
As part of an education programme, these were given to schoolchildren to be used to teach the principles of programming. They were designed to be compact in size but have an assortment of sensors and feedback devices and to spark the creativity of children to the potential of programming.
After the first distribution, they were made available commercially for all to use.
Reference
Subscribe to:
Posts (Atom)