This was then copied to the device which then causes the device to restart. The device now appeared as a USB memory device.
Friday, 21 May 2021
Adafruit Trinkey
This was then copied to the device which then causes the device to restart. The device now appeared as a USB memory device.
Saturday, 24 April 2021
Writing Windows Services - Creating a Windows Service
Introduction
Creating the service
In Visual Studio go to File/New/Project.
On the dialogue select Windows Service (.NET Framework).
Name the project and click Create.
Rename the Service1.cs file. VS will offer to rename the references as well, agree to it.
In the Design Tab, select Properties from the short cut menu.
Name the service. This is at the bottom of the properties and is easy to overlook (the error starts "service name contains invalid characters").
Add an Event Log object.
View Code to see the code.
Add a custom event log.
{
InitializeComponent();
eventLog1 = new System.Diagnostics.EventLog();
if (!System.Diagnostics.EventLog.SourceExists("MySource"))
{
System.Diagnostics.EventLog.CreateEventSource(
"MySource", "MyNewLog");
}
eventLog1.Source = "MySource";
eventLog1.Log = "MyNewLog";
}
Add polling to the OnStart.
Add method called by timer.
{
eventLog1.WriteEntry("In OnStart.");
ServiceStatus serviceStatus = new ServiceStatus();
serviceStatus.dwCurrentState = ServiceState.SERVICE_START_PENDING;
serviceStatus.dwWaitHint = 100000;
SetServiceStatus(this.ServiceHandle, ref serviceStatus); // Set up a timer that triggers every minute.
Timer timer = new Timer();
timer.Interval = 60000; // 60 seconds
timer.Elapsed += new ElapsedEventHandler(this.OnTimer);
timer.Start();
// Update the service state to Running.
serviceStatus.dwCurrentState = ServiceState.SERVICE_RUNNING;
SetServiceStatus(this.ServiceHandle, ref serviceStatus);
}
If the start (and/or) stop process is expected to take some time, it is possible to add additional service status information.
Creating the installer
Select the Service code file in Solution Explorer and choose View Designer.
In the Design View select the background and Add Installer.
This will add ProjectInstaller.cs to the project.
Click on the serviceInstaller1 and select Properties
Ensure the service name is correct, add a description and a display name.
Set the StartType to Automatic.
Right click on serviceProcessInstaller1 and select Properties. Set the Account property to LocalSystem.
Build the service
In the Solution Explorer select the service project and right click and select properties.
On the Application tab select the service program as the Startup object.
Build the project via Build/Build on the menu.
Installing the Service
Open the Developer Command Prompt for Visual Studio as Administrator from the Windows Start menu.
Change Directory to the location of the service executable.
Enter the command: installutil "My First Service.exe"
Checking your work
In the search box on the task bar type "services" and select the "Services" app.
Check for your new service.
Again in the search box on the task bar type "event" and select the Event Viewer.
Expand the Applications and Services Logs and look for your new log. Refresh the log to see each new log entry as the timer triggers.
Updating your Service
Now your service is n place and running, but you need to update it. Now you can uninstall the service (see later), rebuild it and re-install it.
Alternatively, you can just stop the service (using the Services app), rebuild it, and restart the service.
Cleaning Up
Open the Developer Command Prompt for Visual Studio as Administrator.
Change the Directory to where the executable is located.
Enter the command
installutil /u "My First Service.exe"
To uninstall the service.
References
https://en.wikipedia.org/wiki/Windows_service
https://en.wikipedia.org/wiki/Daemon_(computing)
https://docs.microsoft.com/en-us/dotnet/api/system.serviceprocess.servicecontroller
https://docs.microsoft.com/en-us/dotnet/api/system.diagnostics.eventloginstaller
Saturday, 3 April 2021
Delivering files to the Browser
Sometimes you want to embed files in a browser, such as images or PDF files.
With modern browsers it is easy to just add some HTML to display a file.
<object data="documents/Hello World.pdf" type="application/pdf" width="100%" height="800px">
<p>It appears you don't have a PDF plugin for this browser.</p>
</object>
The file to be displayed needs to be in a valid location on a web server, either the webserver delivering the page or an external one accessed with a full URL.
This is fine if you do not care that it potentially exposes your file structure.
If your webserver runs a scripting language it is possible to script the delivery of the file - the file does not have to be located in a similar location to the web server files, nor does it need to be accessible by HTTP (though it can be but hidden on a SharePoint or cloud location).
The following uses ASP.NET Core to build a RESTFul interface to deliver selected files on receipt of a request.
If you have not built a Web API project before, it is worth running through the tutorial here (https://docs.microsoft.com/en-us/aspnet/core/tutorials/first-web-api?view=aspnetcore-5.0&tabs=visual-studio).
Web API to deliver selected files
This Web API uses a RESTFul interface to request a file, the file request is included within the URL, and in this case is just an integer.
Requests to the Web API have the form:
http://<domanin name>/getpdf/<file id>
The test web page builds on the HTML above, the data attribute containing the RESTFul URL to select the files.
<object data="https://localhost:44310/getpdf/0" type="application/pdf" width="100%" height="800px">
<p>It appears you don't have a PDF plugin for this browser.</p>
</object>
GetPDFController.cs
The following code is for a controller (additional code is required, use the set up from the tutorial).
using Microsoft.AspNetCore.Mvc;
using Microsoft.Extensions.Logging;
using System;
/// <summary>
/// Web App controller
/// Controller for RESTful access to PDFs
/// The last part of the URL is an integer that selects a specific PDF
/// https://<host>/getpdf/<pdfID>
/// </summary>
namespace GetPDF.Controllers
{
[ApiController]
[Route("[controller]")]
public class GetPDFController : ControllerBase
{
private readonly ILogger<GetPDFController> _logger;
public GetPDFController(ILogger<GetPDFController> logger)
{
_logger = logger;
}
/// <summary>
/// Returns a PDF selected by <paramref name="pdfID"/
/// THis example uses a simple switch to select the PDF,
/// in a real application this might be search parameters or
/// >multiple values that build into the file path
///
/// Additionally, in a real application there would be a
/// requirement for the authentication of the requester.
/// Additionally the PDF could be watermarked before being
/// sent.
/// </summary>
/// <param name="pdfID">PDF identifier</param>
/// <returns>PDF or 404</returns>
[HttpGet]
[Route("{pdfID:int}")]
public IActionResult Get(int pdfID)
{
string filename;
// This is for demonstration purposes only.
// This would require a more complicated solution
switch (pdfID)
{
case 0:
filename = @"C:\inetpub\wwwroot\documents\file-0.pdf";
return new PhysicalFileResult(filename, "application/pdf");
case 1:
filename = @"C:\inetpub\wwwroot\documents\file-1.pdf";
return new PhysicalFileResult(filename, "application/pdf");
default:
return NotFound();
}
}
}
}
References
https://en.wikipedia.org/wiki/ASP.NET_Core
https://docs.microsoft.com/en-us/aspnet/core/web-api/action-return-types?view=aspnetcore-5.0
Pimoroni Enviro board
The Pimoroni Enviro pHAT format board combines a BME280 temperature, pressure and humidity sensor, LTR559 light and proximity sensor, a microphone and small colour LCD.
The Enviro board comes packed in a neatly printed anti-static bag (I was too excited to photograph it before opening it up)
Pimoroni have a Python library and a bunch of examples.
Assembly was easy, and a a pair of stand-offs secured the sandwich.
Saturday, 27 March 2021
Developing Linux programs in Visual Studio C++
Though Raspberry PIs (and other Linux based machines) are well supported with development environments, the familiar Windows based Visual Studio does make it easier to develop applications, especially where the target machine is not particularly powerful.
The following uses the free Visual Studio Microsoft Visual Studio Community 2019 Version 16.9.2.
Set Up
Start the Visual Studio Installer from the Start button or by searching.
Update Visual Studio.
Once it has been updated, click on the Modify button (not quite as obvious as it could be).
Select the Linux C++ option (you need to scroll down a bit).
Click on the Modify button (bottom right).
Set up Linux machine
sudo apt-get install openssh-server g++ gdb make ninja-build rsync zip
Start SSH on the Linux machine (if not already started).
sudo service ssh start
First project
Start Visual Studio. Click File/New Project.
Search for Linux templates.
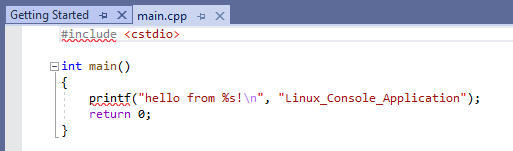
Start with a Console Application, suitable for any Linux machine.
This provides a bare bones Hello World C++ project.
Click on Build/Rebuild Project.
Visual Studio will ask for the Linux machines hostname, username and password. The username and password should be a login on the Linux machine. Ensure that the Linux machine is configured to allow SSH through the firewall (see Simple Firewall oSimple Firewall r the Raspberry Pi Config program).
On the Linux machine you will find a folder called projects in the user folder. See below.
Open a terminal on the Linux machine and change directory to this location.
To run the program enter.
./"Linux Console Application.out"
https://docs.microsoft.com/en-us/cpp/linux/create-a-new-linux-project?view=msvc-160
Saturday, 6 March 2021
Raspberry Pi COBOL
COBOL
Introduction
COBOL is one of the oldest computer languages, having been created in 1959. COBOL is an acronym COmmon Business Oriented Language.
The language grew out of a US Department of Defence requirement for a portable programming language for data processing.
Installation
sudo apt-get install open-cobol
First program
Use the Geany editor (Visual Studio Code might work as well)
Identification Division.
Program-ID. HelloWorld.
Data Division.
Procedure Division.
Main-Paragraph.
Display "Hello World"
Stop Run.
Open a console window and change the directory to the location of the file.
Compile with
cobc -x -o hello HelloWorld.cbl
References
https://en.wikipedia.org/wiki/COBOL
https://en.wikipedia.org/wiki/GnuCOBOL
http://opencobol.add1tocobol.com/gnucobol/
http://rosettacode.org/wiki/Category:COBOL
https://gnucobol.sourceforge.io/doc/gnucobol.html
Friday, 5 February 2021
BBC Microbit Version two
So while I was ordering the Raspberry Pi Pico, I also ordered the recently released BBC Microbit V2 from Pimoroni.
Here is a comparison shot of the V1 (top) and V2 (bottom).
On this side, the most obvious change are the crenellations on the connectors.They make it easier to use crocodile clips, preventing them slipping onto the adjacent connectors. The touch sensor is under the Microbit logo.