Android SDK and the Intel HAXM
The Android SDK has an Android emulator that can emulate ARM and x86 based Android devices.The build #AI-181.5540.7.32.5056338, built on October 9, 2018 dated October 2018 has an issue with ARM based emulation which prevents it from working.
The x86 emulation requires the availability of the Intel Hardware Accelerated Execution Manager.
This process will require you to go into the BIOS and make changes. It is possible to seriously break your computer if you make the wrong changes.
The Hardware Accelerated Execution Manager can be downloaded via the Android Studio SDK manager. It will say it has installed it, but it hides some installation issues.
Once you have "installed" it, on a Windows PC go to:
C:\Users\<user>\AppData\Local\Android\Sdk\extras\intel\Hardware_Accelerated_Execution_Manager
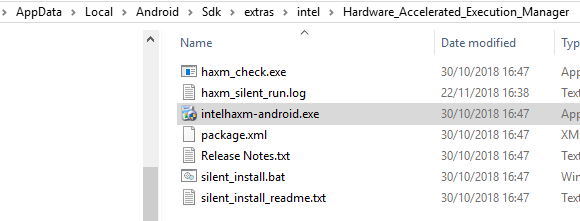
Start a command prompt (type cmd in the search box).
Copy the file path from File Explorer and in the command prompt type CD .
Then paste the file path and press return.
Type dir and return.
The command window will show something similar to this:
22/11/2018 16:37 <DIR> .
22/11/2018 16:37 <DIR> ..
30/10/2018 16:47 108,792 haxm_check.exe
22/11/2018 16:38 225 haxm_silent_run.log
30/10/2018 16:47 2,937,888 intelhaxm-android.exe
30/10/2018 16:47 2,907 package.xml
30/10/2018 16:47 4,483 Release Notes.txt
30/10/2018 16:47 8,675 silent_install.bat
30/10/2018 16:47 2,274 silent_install_readme.txt
7 File(s) 3,065,244 bytes
Type haxm_check.exe and return.
Hopefully the response will be:
VT support - yes
NX support - yes
If it is, then you can proceed. If not, you will have to wait for the ARM emulator to be fixed.
If you run the intelhaxm-android.exe program (right click and run as administrator) it will probably tell you it is installed.
What you need to do is uninstall it (close Android Studio if it is open).
Once it has been uninstalled, run intelhaxm-android.exe again and install it. It will probably tell you that the VT support is not enabled and roll back the installation. If it works, well done - nothing more to do.
To enable the VT support, you need to go into your computer’s BIOS or equivalent.
You will need to know how to get into the BIOS, this normally requires the machine to be restarted and then various buttons pressed.
It is a good idea to find out the access method before shutting your computer down.
HP laptops post 2011 generally require the Escape key to be repeatedly pressed after starting. From there follow the instructions.
Close everything down and shut down your computer.
Enact the arcane gestures required and go into the BIOS manager. Enable the VT (Virtualisation technology). Save and restart the machine.
Once you are logged in, go back to C:\Users\<user>\AppData\Local\Android\Sdk\extras\intel\Hardware_Accelerated_Execution_Manager
And run the intelhaxm-android.exe program as administrator.


This should allow you to set up an X86 emulator in the Android Studio and start it.
