I ordered a Kitronik MOVE mini robot from Pimoroni last year. This provides a battery powered chassis that can be controlled using an on-board BBC micro:bit.
The kit comes in a robust cardboard box, unfortunately not big enough to take the completed robot (but see later).
The components are neatly bagged up, and include the required AA batteries.
The body is made up of laser cut acrylic pieces. There are two continuous rotation servo motors to provide the motive power.
The controller board is designed to use countersunk screws to provide the connection between the micro:bit and the board. This does mean that it limits the control to the two motors and the light bar (there is an option to isolate the light bar, giving access to an additional - optional - servo).
The back of the board. Note at bottom right the area to cut to access the third servo).
The kit does not include a BBC micro:bit. As one of the options is to control the robot's own micro:bit using a second micro:bit, I ordered a second one.
I covered the BBC micro:bit in an earlier post.
The instructions to build the robot can be found here. They are generally straightforward (so much so I forgot to pause to photograph the stages).
The one thing to be aware of is that the controller board only operates on the batteries. I started testing the board assuming that the USB supply would power the micro:bit and the controller board and was testing it with the battery switched off. The micro:bit was fine, but the ZIP LED light bar was not lighting up. Switching the battery pack on solved the problem.
As you can see, the micro:bit is screwed to the controlled board. The ZIP LEDs are above the micro:bit and the 5x5 matrix is visible.
Side view. The robot has two wheels and uses the front and rear of the side walls as stabilising rails.
The ZIP LEDs are very bright.
Sunday, 17 February 2019
Saturday, 16 February 2019
Python Web Scraper
Search Engine Optimisation is a mysterious skill, the companies behind search engines do not want to make it easy to play their engines to force certain pages to the top of the results list.
However, one of the things that is listed as being useful is the presence of the key search words in the body of the HTML page.
The following is a simple Python script that retrieves the text from a supplied URL creates a searchable tree using LXML, extracts the text and then counts the occurrences of non numeric words longer than three characters.
# Functions to scrape the body text from a web page
# and return the top 10 occurring words
# Currently does not play well with HTML comments
# Also note that the order of the printed results is subject to change,
# this can be important if there are more than one element with the
# same occurrence as the last element displayed
from lxml import html
import requests
import re
import collections
noisewords=['at','and','an','the','we','to','is','of','by','not','in','as','be','or','for']
def testgoodword(astring):
if astring.strip() in noisewords:
return False
else:
return True
def webscrape(aURL):
# Get the page from the URL
page = requests.get(aURL)
# Make an HTML tree from the text
tree = html.fromstring(page.content)
# Extract non script and non style text from the HTML tree
bodytext=""
for elt in tree.getiterator():
if elt.text is not None:
if elt.tag!="script" and elt.tag!="style":
if elt.text.strip()!='':
bodytext=bodytext+' '+elt.text
# Define a regular expression to extract words
# (one or more alphanumerics followed by white space character)
p = re.compile(r'\w\w+\s')
# Use a Counter collection to record the occurrences (the word is the key)
# Counter collections return zero if there is no element with a supplied key
c = collections.Counter()
# Iterate through the "words2 found by the regular expression
iterator=p.finditer(bodytext)
for match in iterator:
testword=match.group().strip().lower()
if not testword.isnumeric(): # Ignore numbers
if testgoodword(testword): # Only use non noise words
c[testword]+=1
return c
# Print the most common words
def print_webscrape(c):
print ('Most common:')
for word, count in c.most_common(10):
print ('\'%s\': %7d' % (word, count))
# Testing code
if __name__ == "__main__":
# execute only if run as a script
c=webscrape("https://en.wikipedia.org/wiki/Python_(programming_language)")
print_webscrape(c)
Most common:
'python': 189
'retrieved': 127
'programming': 49
'software': 35
'language': 29
'edit': 29
'with': 29
'pep': 26
'languages': 24
'march': 23
>>>
Most common:
'python': 189
'retrieved': 127
'programming': 49
'software': 35
'edit': 29
'language': 29
'with': 29
'pep': 26
'languages': 24
'march': 23
>>>
Note the order of "edit", "language" and "with" alter. If you really want the top ten, you need to expand the range until the you have a different count.
Most common:
'python': 189
'retrieved': 127
'programming': 49
'software': 35
'with': 29
'language': 29
'edit': 29
'pep': 26
'languages': 24
'march': 23
'february': 23
'org': 23
'from': 21
'van': 20
'december': 18
A you can see, there are three results with a count of 23. The Counter.most_common() function will return them in a random order
However, one of the things that is listed as being useful is the presence of the key search words in the body of the HTML page.
The following is a simple Python script that retrieves the text from a supplied URL creates a searchable tree using LXML, extracts the text and then counts the occurrences of non numeric words longer than three characters.
# Functions to scrape the body text from a web page
# and return the top 10 occurring words
# Currently does not play well with HTML comments
# Also note that the order of the printed results is subject to change,
# this can be important if there are more than one element with the
# same occurrence as the last element displayed
from lxml import html
import requests
import re
import collections
noisewords=['at','and','an','the','we','to','is','of','by','not','in','as','be','or','for']
def testgoodword(astring):
if astring.strip() in noisewords:
return False
else:
return True
def webscrape(aURL):
# Get the page from the URL
page = requests.get(aURL)
# Make an HTML tree from the text
tree = html.fromstring(page.content)
# Extract non script and non style text from the HTML tree
bodytext=""
for elt in tree.getiterator():
if elt.text is not None:
if elt.tag!="script" and elt.tag!="style":
if elt.text.strip()!='':
bodytext=bodytext+' '+elt.text
# Define a regular expression to extract words
# (one or more alphanumerics followed by white space character)
p = re.compile(r'\w\w+\s')
# Use a Counter collection to record the occurrences (the word is the key)
# Counter collections return zero if there is no element with a supplied key
c = collections.Counter()
# Iterate through the "words2 found by the regular expression
iterator=p.finditer(bodytext)
for match in iterator:
testword=match.group().strip().lower()
if not testword.isnumeric(): # Ignore numbers
if testgoodword(testword): # Only use non noise words
c[testword]+=1
return c
# Print the most common words
def print_webscrape(c):
print ('Most common:')
for word, count in c.most_common(10):
print ('\'%s\': %7d' % (word, count))
# Testing code
if __name__ == "__main__":
# execute only if run as a script
c=webscrape("https://en.wikipedia.org/wiki/Python_(programming_language)")
print_webscrape(c)
Most common:
'python': 189
'retrieved': 127
'programming': 49
'software': 35
'language': 29
'edit': 29
'with': 29
'pep': 26
'languages': 24
'march': 23
>>>
Most common:
'python': 189
'retrieved': 127
'programming': 49
'software': 35
'edit': 29
'language': 29
'with': 29
'pep': 26
'languages': 24
'march': 23
>>>
Most common:
'python': 189
'retrieved': 127
'programming': 49
'software': 35
'with': 29
'language': 29
'edit': 29
'pep': 26
'languages': 24
'march': 23
'february': 23
'org': 23
'from': 21
'van': 20
'december': 18
A you can see, there are three results with a count of 23. The Counter.most_common() function will return them in a random order
References
Tuesday, 29 January 2019
Simple backup of a Raspberry Pi
Back up SD card data to USB drive
The Raspberry Pi generally uses an SD (or microSD) card as its main storage. This is a cheap and generally reliable storage medium, but it is vulnerable to problems if the power is interrupted while data is being written.If the power is interrupted (by the cat pulling the power lead out or you thinking it is the mobile 'phone's charger etc.) there is always the possibility that the SD card may become corrupted and all the data is lost.
Of course, you should be running a backup process on any system.
Back up home directory
To back up your home directory to a mounted USB drive, use the following command lines. You will need to know the name of the USB drive (have a look in /media.pi for the USB drive), replace the "name_of_usbdrive" with the actual drive name. You might want to replace "mypi" with the network name of the machine if you have a number of different systems.
First change directory to the /home directory (off of root).
cd /home/
Note space between change directory and directory path.
sudo tar czf /media/pi/name_of_usbdrive/backups/mypi_$(date +%Y%m%dT%H%M)home.tar.gz pi
Once that is running, go off and make a beverage of choice, it will take a while, and using the machine will upset the backup (as any use may cause a file change).
Note
One thing to be aware of, this will back up the contents of the trash bin.
This might cause issues as the zip process falls over at about 4GB, and deleting files just puts them in the bin.
It might be worth emptying the bin occasionally.
You might also not want some deleted items to be backed up ^___^.
Saturday, 15 December 2018
Raspbian Pixel desktop VNC Viewer
Since September 2016, all Raspberry Pi Raspbian distributions have included the RealVNC Virtual Network Computer server and viewer.
This allows the remote connection to the desktop on a Raspberry Pi machine. This is great if you want to to run your Raspberry Pi "headless" and do not want to use the Secure SHell (SSH).
You can connect to your Raspberry Pi from another (non Raspberry PI) machine by downloading and installing the RealVNC viewer (make your selection from the operating systems shown here https://www.realvnc.com/en/connect/download/viewer/. The RealVNC viewer is available from the Google Play Store (and probably from the Apple store as well). For Raspbian on the Raspberry Pi, wou can just get it from the Raspbian repository using the normal apt-get install (instructions are available from the above link)
Now I have an elderly Samsung Windows Netbook which is having a second life as a Raspbian Pixel netbook. Now this would be really useful to see what is happening on any live Raspberry Pis. Unfortunately, the non Raspberry PI distribution of Raspbian does not contain the RealVNC viewer.
So going back to the RealVNC downloads page, select the Linux option:
https://www.realvnc.com/en/connect/download/viewer/linux/
You need to select DEB x86 from the drop down menu, then click on Download VNC Viewer.
The file will (by default) appear in your Downloads directory. The one I received was called VNC-Viewer-6.18.907-Linux-x86.deb.
In the File Manager, right click and select Package Install. This will request your password to give the installer permission to make changes to the operating system (in the same way that normally you use SUDO to give heightened permissions).
Once it has been installed, the RealVNC viewer can be found in the Internet options on the start menu.
You will need to know either the ip address of the Raspberry Pi, or the network name. A default Raspberry Pi is normally called "raspberrypi", so should appear on the local network under the name "raspberrypi.home".
This allows the remote connection to the desktop on a Raspberry Pi machine. This is great if you want to to run your Raspberry Pi "headless" and do not want to use the Secure SHell (SSH).
You can connect to your Raspberry Pi from another (non Raspberry PI) machine by downloading and installing the RealVNC viewer (make your selection from the operating systems shown here https://www.realvnc.com/en/connect/download/viewer/. The RealVNC viewer is available from the Google Play Store (and probably from the Apple store as well). For Raspbian on the Raspberry Pi, wou can just get it from the Raspbian repository using the normal apt-get install (instructions are available from the above link)
Now I have an elderly Samsung Windows Netbook which is having a second life as a Raspbian Pixel netbook. Now this would be really useful to see what is happening on any live Raspberry Pis. Unfortunately, the non Raspberry PI distribution of Raspbian does not contain the RealVNC viewer.
So going back to the RealVNC downloads page, select the Linux option:
https://www.realvnc.com/en/connect/download/viewer/linux/
You need to select DEB x86 from the drop down menu, then click on Download VNC Viewer.
The file will (by default) appear in your Downloads directory. The one I received was called VNC-Viewer-6.18.907-Linux-x86.deb.
In the File Manager, right click and select Package Install. This will request your password to give the installer permission to make changes to the operating system (in the same way that normally you use SUDO to give heightened permissions).
Once it has been installed, the RealVNC viewer can be found in the Internet options on the start menu.
You will need to know either the ip address of the Raspberry Pi, or the network name. A default Raspberry Pi is normally called "raspberrypi", so should appear on the local network under the name "raspberrypi.home".
References:
Sunday, 9 December 2018
PIMORONI Breakout Garden
The Pimoroni Breakout Garden HAT is a clever way of allowing the development of sophisticated sensor and display systems without having to do lots of soldering.
As a HAT, it is fitted with a female 2x20 pin socket so it can be attached to any Raspberry Pi with 2x20 way expansion bus (Raspberry Pi Plus versions to date). Raspberry Pi Zero boards require the headers to be added (the Raspberry Pi Zero WH is supplied with the header already soldered/
This is going to be used with a Raspberry Pi Zero WH fitted into a Pibow Zero W case. To improve stability, a Pibow Breadboard Base was added to the bottom of the stack of laser cut acrylic slices that make up the case. The supplied bolts are long enough to take the additional slice.
Assembly was reasonably straightforward, I did need to ease a couple of the corners with a curved needle file to make the Zero board fit correctly.
To use a Zero with a keyboard and display, you do need to have an On The Go cable for the micro USB (top) and a Micro to HDMI adapter (bottom). I got mine as part of the Pimoroni OctoCam package.
The key feature of the Breakout Gatden HAT is the six large sockets on the top.
These are designed to take the special format breakout board from Pimoroni.
The first breakout board is the BME680 Air Quality Sensor.
The front shows the five connectors. The power and ground connections are diode protected, so if you do plug them in the wrong way round, nothing bad (or indeed nothing at all) happens.
The breakout has temperature, pressure, humidity and air quality sensors built in.
The LSM303D is a combined accelerometer and magnetometer
It can provide X, Y, Z values for acceleration and magnetic field strength (making it suitable for use as a digital compass).
The third sensor is the BMP280 temperature, pressure and altitude sensor.
The last breakout board I have is the 1.12" 128x128 pixel OLED display board.
Next, putting them all to work.
As a HAT, it is fitted with a female 2x20 pin socket so it can be attached to any Raspberry Pi with 2x20 way expansion bus (Raspberry Pi Plus versions to date). Raspberry Pi Zero boards require the headers to be added (the Raspberry Pi Zero WH is supplied with the header already soldered/
This is going to be used with a Raspberry Pi Zero WH fitted into a Pibow Zero W case. To improve stability, a Pibow Breadboard Base was added to the bottom of the stack of laser cut acrylic slices that make up the case. The supplied bolts are long enough to take the additional slice.
Assembly was reasonably straightforward, I did need to ease a couple of the corners with a curved needle file to make the Zero board fit correctly.
To use a Zero with a keyboard and display, you do need to have an On The Go cable for the micro USB (top) and a Micro to HDMI adapter (bottom). I got mine as part of the Pimoroni OctoCam package.
The key feature of the Breakout Gatden HAT is the six large sockets on the top.
These are designed to take the special format breakout board from Pimoroni.
The first breakout board is the BME680 Air Quality Sensor.
![]() |
| Back |
The breakout has temperature, pressure, humidity and air quality sensors built in.
It can provide X, Y, Z values for acceleration and magnetic field strength (making it suitable for use as a digital compass).
The third sensor is the BMP280 temperature, pressure and altitude sensor.
The last breakout board I have is the 1.12" 128x128 pixel OLED display board.
Next, putting them all to work.
Friday, 23 November 2018
FutureLearn Begin Programming Week 3 Android game video
This is for the Week 3 element of the FutureLearn course Begin Programming.
Because I am not very good with video games, I have left the one point for hitting the ball, and five points for hitting the target.
This was recorded with the emulator's built in screen recorder, hence the odd resolution.
Thursday, 22 November 2018
Android SDK, Emulator and the Intel HAXM
Android SDK and the Intel HAXM
The Android SDK has an Android emulator that can emulate ARM and x86 based Android devices.The build #AI-181.5540.7.32.5056338, built on October 9, 2018 dated October 2018 has an issue with ARM based emulation which prevents it from working.
The x86 emulation requires the availability of the Intel Hardware Accelerated Execution Manager.
This process will require you to go into the BIOS and make changes. It is possible to seriously break your computer if you make the wrong changes.
The Hardware Accelerated Execution Manager can be downloaded via the Android Studio SDK manager. It will say it has installed it, but it hides some installation issues.
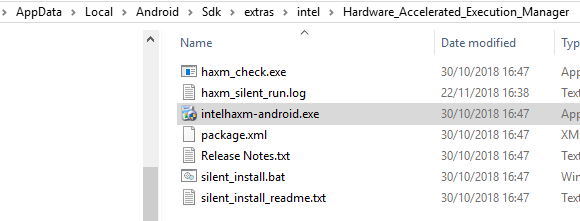
Once you have "installed" it, on a Windows PC go to:
C:\Users\<user>\AppData\Local\Android\Sdk\extras\intel\Hardware_Accelerated_Execution_Manager
First you need to check that your hardware is suitable to run HAXM.
Start a command prompt (type cmd in the search box).
Copy the file path from File Explorer and in the command prompt type CD .
Then paste the file path and press return.
Type dir and return.
The command window will show something similar to this:
22/11/2018 16:37 <DIR> .
22/11/2018 16:37 <DIR> ..
30/10/2018 16:47 108,792 haxm_check.exe
22/11/2018 16:38 225 haxm_silent_run.log
30/10/2018 16:47 2,937,888 intelhaxm-android.exe
30/10/2018 16:47 2,907 package.xml
30/10/2018 16:47 4,483 Release Notes.txt
30/10/2018 16:47 8,675 silent_install.bat
30/10/2018 16:47 2,274 silent_install_readme.txt
7 File(s) 3,065,244 bytes
Type haxm_check.exe and return.
Hopefully the response will be:
VT support - yes
NX support - yes
If it is, then you can proceed. If not, you will have to wait for the ARM emulator to be fixed.
If you run the intelhaxm-android.exe program (right click and run as administrator) it will probably tell you it is installed.
What you need to do is uninstall it (close Android Studio if it is open).
Once it has been uninstalled, run intelhaxm-android.exe again and install it. It will probably tell you that the VT support is not enabled and roll back the installation. If it works, well done - nothing more to do.
To enable the VT support, you need to go into your computers BIOS or equivalent.
You will need to know how to get into the BIOS, this normally requires the machine to be restarted and then various buttons pressed.
It is a good idea to find out the access method before shutting your computer down.
HP laptops post 2011 generally require the Escape key to be repeatedly pressed after starting. From there follow the instructions.
Close everything down and shut down your computer.
Enact the arcane gestures required and go into the BIOS manager. Enable the VT (Virtualisation technology). Save and restart the machine.
Once you are logged in, go back to C:\Users\<user>\AppData\Local\Android\Sdk\extras\intel\Hardware_Accelerated_Execution_Manager
And run the intelhaxm-android.exe program as administrator.
This should allow you to set up an X86 emulator in the Android Studio and start it.
Subscribe to:
Posts (Atom)