Sunday, 25 December 2022

Adafruit QT Py RP2040

Introduction

The Adafruit QT Py is a range of diminutive development boards. The QT Py pinout and shape is Seeed Xiao compatible and has castellated pads to allow it to be soldered to a PCB (note, some boards have components on the bottom of the board so will require a cut-out - this is one of them).

The boards have a QWIIC socket. It also has an RGB Neopixel.

Adafruit have released a version using the Raspberry Pi RP2040 processor (which requires a double-sided board to fit all the bits in the format).

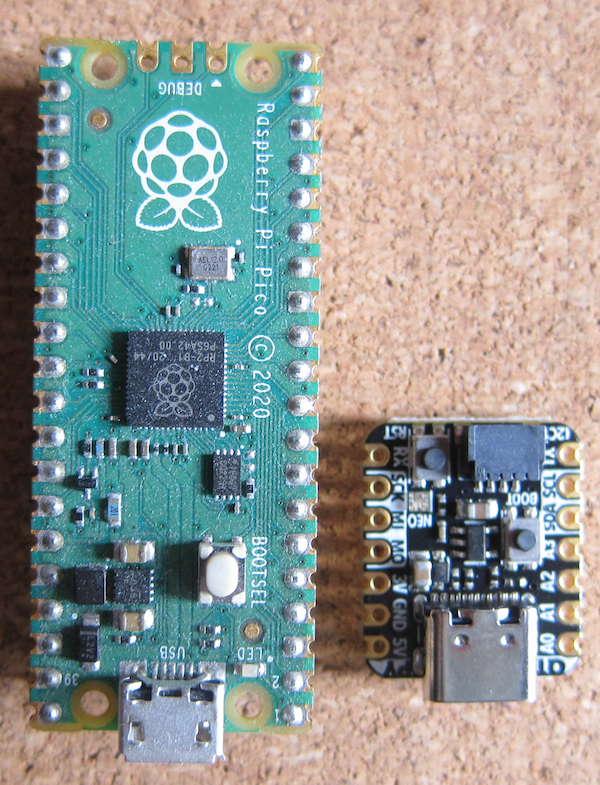
It is quite a lot smaller than the Raspberry Pi PICO.
As you can see, the board, unlike the PICO is double sided. To solder it to another board, quite substantial cut outs would be required in the other board.

The QWIIC socket allows suitable I2C breakout boards to be connected without soldering. In this case a cable connected to the QT Py is connected to a PIMORONI BreakOut Garden adaptor (with a 1.12" OLED display).

Adafruit recommend CircuitPython but there is also an official MIcroPython port.However, there is little or no documentation on programming the board beyond that for a vanilla PICO.

Installing MicroPython

Download the UF2 file from the MicroPython site. If you are downloading onto a Windows machine, right click on the downloaded file, select Properties and Unblock 

Plug a USB A to USB C data cable into the board and the computer.

Hold the BOOTSEL button and press the RESET button.

The board will appear as a drive.

Copy the UF2 file to the board.

Once it has finished downloading, the board will restart.

Blink

The QT Py RP2040 has a Neopixel rather than the traditional LED on pin 13. This means that the normal Blink program does not work.

The CircuitPython UF2 specifically for the board has built in functions to operate the RGB Neopixel, and the board library has constants for the Neopixel pin.

I was unable to locate a Micropython example for the Blink program using a Neopixel.

Checking the pin-out https://learn.adafruit.com/assets/107201 shows that the RGB Neopixel is on pin 12, and the power for the Neopixel is on pin 11. To make the board more power efficient (useful for a battery powered application), the Neopixel can be unpowered in addition to not displaying a colour.

This requires both the Neopixel pin to be passed to the Neopixel constructor, and the power pin set to on.

Code

import time
import machine
import neopixel
# Set up a single Neopixel
pin = machine.Pin(12, machine.Pin.OUT)
pixel = neopixel.NeoPixel(pin, 1)
pixel.brightness = 0.3
# Set the power pin high to activate the Neopixel
power_pin = machine.Pin(11, machine.Pin.OUT)
power_pin.on()
def set_pixel(rgb):
    # Set the first pixel to rgb
    pixel[0] = rgb
    # Write the setting to the Neopixel
    pixel.write()
while True:
    # Set the first pixel to Red
    set_pixel((255, 0, 0))
    time.sleep(0.5)
    # Set the first pixel to off
    set_pixel((0, 0, 0))
    time.sleep(0.5)
    print("Blink!")


References

https://micropython.org/download/ADAFRUIT_QTPY_RP2040/

https://www.adafruit.com/category/1005

https://learn.adafruit.com/adafruit-qt-py/overview

https://shop.pimoroni.com/products/adafruit-qt-py-rp2040?variant=39341945487443

https://learn.adafruit.com/adafruit-qt-py-2040/blink

https://docs.micropython.org/en/latest/rp2/quickref.html#neopixel-and-apa106-driver

https://docs.micropython.org/en/latest/rp2/quickref.html#i2s-bus


Mac Mini (third generation - 2012)

This Mac Mini replaced a Windows XP machine when XP came out of support. I thought OS/X was more familiar than XP's replacement.

It is a 2012 third generation model. It has a two core 2.5GHz i5 processor, 4GB of RAM, and a 500GB hard drive.

The akuminium unibody design still looks stylish.

It has plenty of ports - left to right: power button, mains in, Gigabit Ethernet, FireWire 800, HDMI, Mini-DisplayPort, USB 3.0 ports, SDXC card slot, microphone, headphones.
This version theoretically could be upgraded. The memory used sockets and there was space to add a second hard drive (the server version came with a second drive already fitted).
The front is distinctly minimalist.

This too has now reached the end of support, and so is due for replacement.

Tuesday, 20 December 2022

Adafruit MacroPad RP2040 Starter Kit

Adafruit MacroPad RP2040 contains a built in Raspberry Pi 2040 processor, 3x4 Neopixel RGB keypad, a rotary encoder and a STEMMA QT connector.

The rotary encoder also functions as the Pico's BOOTSEL button.
The RP2040 processor is just to the left of the display cable. Originally I thought this used a separate Raspberry Pi Pico board and so left this until I could get a Pico W with pre-soldered headers. Once I managed to buy one, I discovered it was complete.
There is  a QWIIC/STEMMA I2C on the right hand side of the board, plus a RESET button just above it. Below the first row of keys is a buzzer.
The Starter Kit has a decorated back plate, one side includes Voyager artwork.
The other side has artwork resembling the Apollo flight computer.
There is a reinforcing plate.
The kit includes four screws to hold the boards together, plus four feet and a rotary knob.


The device is programmable either using CircuitPython or Arduino.

PIMORONI Inky Pack with Raspberry Pi Pico W

 The PIMORONI Inky Pack is compact 296x128 pixel mono E Ink pack.

It has a socket for a Pico or Picow W, plus a Reset button.
The use of the the Inky Pack and a Raspberry Pi Pico W allows information to be obtained from outside sources and displayed on the Inky Pack. The E-Ink display only needs power when changing the display. Once changed, the display remains even when the power is removed (you may notice that there is no power cable in the photographs).

These are test runs with the data source being the BBC Weather RSS feed.

PIMORONI Plasma Stick 2040 W Christmas Lights

 So having played around with the Plasma Stick 2040 and run a web server on it, it was time to use it for Christmas lights

Initially the idea was to use the PICO W as an Access Point and control it via a web interface. This would make it independent of any local access point. Unfortunately there were some issues which I was unable to resolve before I needed to use the lights in the field. So to be able to change the lights a Rotary Encoder was plugged into the QWIIC socket via a Breakout Garden to QWIIC converter and a QWIIC cable.

For Christmas tree lights of course, the existing web server could have been used, time waits for no developer so it was used "as is".

In addition there is a Pimoroni Snowflake Solo on the tree.


Sunday, 20 November 2022

Enclosures - featuring PIMORONI's IP66 Waterproof Plastic Enclosure

 All this marvellous technology is fine in the comfort of a warm and dry home or office, however what do you do when you want to keep the kit safe and dry (or at least out of the way of fingers or paws).

PIMORONI have just added three IP66 waterproof enclosures to their growing list of products.

Note - IP66 is waterproof, not immersion proof. You can put the enclosure in the garden and it will be safe in the rain, but not actually put it it in water.

This one has external dimensions of 125 x 125 x 75mm, with a clear plastic lids.

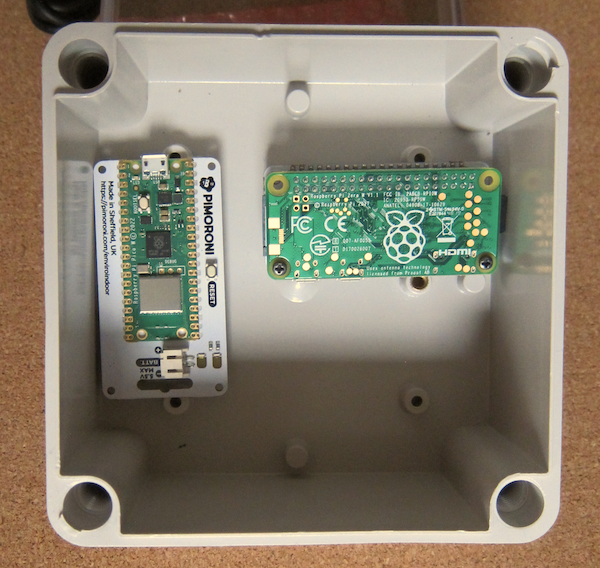
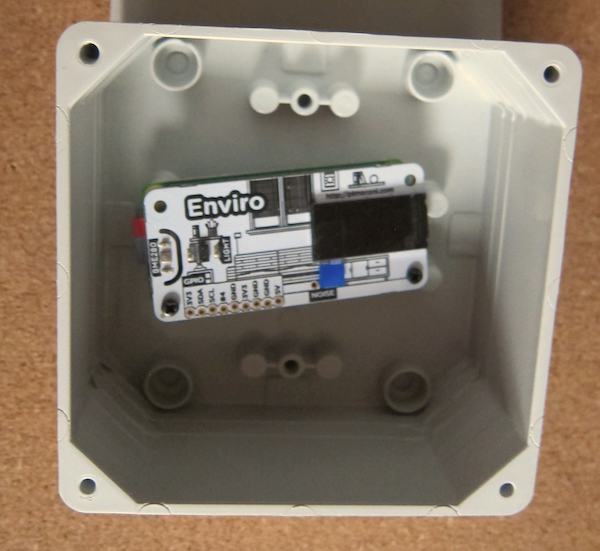
There is ample room for a PIMORONI Enviro board (and battery pack).
Or Raspberry Pi Zero with a PHAT.
Or both.
There is room to take a standard Raspberry Pi (in this case a 4 in a heat sink case) plus space for batteries etc.
The lid is secured by four plastic screws, they have a retainer that should stop them falling out when unscrewed.
The bottom of the case has mounting holes to assist in securing the contents.

There are also holeds on the rear face to add fixings.

Now these are not the only source of enclosures, the folowing two were bought from the late and lamented Maplins. Similar IP65+ enclosures can be found in DIY shops.
This is about the same size as a standard light switch or socket box. 
It will take a Raspberry Pi Zero, there is still room for  a battery pack.

The box comes with a gasket that fits into the lid.

This box is slightly larger ad will take an Enviro board.
It will take a full size Raspberry Pi, but probably not a suitable power supply, so it will need an external power source.
However it will not allow anything to be plugged into the USB sockets.
More space for battery.


Comparison of the three boxes.


PIMORONI Enviro Indoor

 Pimoroni have a range of "Pico Aboard" all in one PICO W based boards.

They comprise a full PICO W board soldered to another board. This alleviates the requirement for the user to solder anything or for the supplier to include a socket and a board with presoldered headers.

The Enviro Indoor board is available on its own or together with an accessory kit.

The accessory kit adds a 2xAA battery pack, a velcro pad pair and a suitable USB cable.
The Enviro Indoor board provides an all in one board complete with a BME688 temperature, pressure, humidity and gas sensor, plus a BH1745 light (luminance and colour) sensor. There is also a Real Time Clock that allows the board to enter a deep sleep mode with the PICO powered down, the board awakening either at a set time or via the "Poke" button top right. If the on-board sensors are not enough, there is a QWIIC/STEMMA socket for additional I2C sensors.
On the back there is a battery connector and a Reset button, eliminating the requirement to pull the USB cable to enter Boot mode.

The board is preloaded with an emviromental sensing program complete with a provisioning system allowing it to be set up without programming.

Sunday, 13 November 2022

PIMORONI Plasma Stick 2040 W web site controlled colour

The PIMORONI Plasma Stick 2040 W or Wireless Plasma Kit is a Raspberry Pi PICO controlled  LED controller for 5V WS2812/Neopixel/SK6812 LED strips.

The PICO W has built in wireless support which can be used to host a limited web site. A full web stack probably exceeds the capabilities of the microcontroller but by using a (semi) RESTFul web server it is possible to control the LED strips via a web interface.

AJAX

Asynchronous Javascript And XML (AJAX) uses a combination of web technologies to create asynchronous web applications client-side. It has a long history, and initially required a quite complicated set up. As browser (client-side) support has expanded, it has become much easier to set up responsive web applications that do not require the whole page to be updated.

Though XML is part of the name, the returned data can be anything – in this case the returned data will be JSON.

Client-Side UI

The user interface needs to be simple as it is provided by the PICO.

<!DOCTYPE html>
<html>
    <head>
        <title>AJAX-PICO test frame</title>
        <script lang="JScript">
            function sendData(slideAmount,field)
            {
                // Create an XMLHttpRequest object
                const xhttp = new XMLHttpRequest();
                // Define a callback function
                xhttp.onload = function() {
                    // Get response as JSON
                    var returnType = xhttp.getResponseHeader("Content-Type");
                    //alert(returnType);
                    if(returnType =="application/json"){
                        var returnText = xhttp.responseText;
                        const obj = JSON.parse(returnText);
                        // Get fieldname and corresponding HTML element
                        var fieldname = obj.field;
                        //alert(fieldname);
                        var field = document.getElementById(fieldname);
                        if(field != null){
                            field.innerHTML = obj.value;
                        }
                        else{
                            alert("Field not found - JSON - " + returnText);
                        }
                    }
                }
                // Send a request
                xhttp.open("GET", "plasma2040/" + field +"/"+ slideAmount);
                xhttp.send();
            }
        </script>
    </head>
    <body>
        <div>
            <div>
                <input type="range" id="Red"  min="0" max="255" step="1" value="%d" onchange="sendData(this.value, 'returnRed')">
            </div>
            <div>
                <span id="returnRed">%d</span>
            </div>
            <div>
                <input type="range" id="Green"  min="0" max="255" step="1" value="%d" onchange="sendData(this.value, 'returnGreen')">
            </div>
            <div>
                <span id="returnGreen">%d</span>
            </div>
            <div>
                <input type="range" id="Blue"  min="0" max="255" step="1" value="%d" onchange="sendData(this.value, 'returnBlue')">
            </div>
            <div>
                <span id="returnBlue">%d</span>
            </div>
        </div>
    </body>
</html>


Three Input Range controls and three Spans for the current values.

The three Range controls have an OnChange event defined, which makes a call to a JScript function with the field name and the value of the range control.
The JScript function creates an XMLHTTP object, adds a call back method and sends the request to the server including the field name and its value as a RESTFul URL.
The call back function expects a valid JSON string of the form:

{"field":"< field name>","value":"<value>"}

For example: {"field":"returnRed","value":"128"}
The string is converted into a Jscript object.
The field name is extracted from the object and is  used to identify the Span object to receive the new value, also extarcted from the object.

Server Side

The server-side code is derived from the asynchronous web server example from Connecting to the Internet with Raspberry Pi Pico W.


The HTML string contains the returned web page, with six numeric placeholders (which are replaced with pairs of the three colours).


The built-in LED and the LED strip are set up and a function to set all the LEDs to the current red, green and blue settings created.


A function to connect to the network is created.


The web server function detects if the request is an AJAX request to set a colour or for the controlling web page.


If it is an AJAX request, the calling URL is obtained from the request string, and the sub-parts of the URL are extracted. Element one is the field name, element two is the field value.
The field names are then checked against Red, Green and Blue and the corresponding variables set to the new values.


A JSON string is constructed and returned to the calling browser.


If the request is not to handle an AJAX request, the HTML is returned with the current red, green and blue values set for the Range controls and the span.


Source Code

# The asynchronous web server code is derived from the Raspberry Pi document:
# "Connecting to the Internet with Raspberry Pi Pico W"
# Imports
import network
import socket
import time
from machine import Pin
import uasyncio as asyncio
import plasma
from plasma import plasma_stick
import secrets
# Default page settings
html = """<!DOCTYPE html>
<html>
    <head>
        <title>AJAX-PICO test frame</title>
        <script lang="JScript">
            function sendData(slideAmount,field)
            {
                // Create an XMLHttpRequest object
                const xhttp = new XMLHttpRequest();
                // Define a callback function
                xhttp.onload = function() {
                    // Get response as JSON
                    var returnType = xhttp.getResponseHeader("Content-Type");
                    //alert(returnType);
                    if(returnType =="application/json"){
                        var returnText = xhttp.responseText;
                        const obj = JSON.parse(returnText);
                        // Get fieldname and corresponding HTML element
                        var fieldname = obj.field;
                        //alert(fieldname);
                        var field = document.getElementById(fieldname);
                        if(field != null){
                            field.innerHTML = obj.value;
                        }
                        else{
                            alert("Field not found - JSON - " + returnText);
                        }
                    }
                }
                // Send a request
                xhttp.open("GET", "plasma2040/" + field +"/"+ slideAmount);
                xhttp.send();
            }
        </script>
    </head>
    <body>
        <div>
            <div>
                <input type="range" id="Red"  min="0" max="255" step="1" value="%d" onchange="sendData(this.value, 'returnRed')">
            </div>
            <div>
                <span id="returnRed">%d</span>
            </div>
            <div>
                <input type="range" id="Green"  min="0" max="255" step="1" value="%d" onchange="sendData(this.value, 'returnGreen')">
            </div>
            <div>
                <span id="returnGreen">%d</span>
            </div>
            <div>
                <input type="range" id="Blue"  min="0" max="255" step="1" value="%d" onchange="sendData(this.value, 'returnBlue')">
            </div>
            <div>
                <span id="returnBlue">%d</span>
            </div>
        </div>
    </body>
</html>
"""

# Set up built in LED
led = Pin(15, Pin.OUT)
onboard = Pin("LED", Pin.OUT, value=0)
# Set up LED strip
NUM_LEDS = 50
red = 128
blue = 128
green = 128
# WS2812 / NeoPixel™ LEDs
led_strip = plasma.WS2812(NUM_LEDS, 0, 0, plasma_stick.DAT, color_order=plasma.COLOR_ORDER_RGB)
# Start updating the LED strip
led_strip.start()
# Set all LEDs to current red, green and blue values
def set_all_leds():
    global red
    global green
    global blue
    for i in range(NUM_LEDS):
        led_strip.set_rgb(i, red,green,blue)    
# Set all the LEDs
set_all_leds()
# Connect to network
wlan = network.WLAN(network.STA_IF)
def connect_to_network():
    wlan.active(True)
    wlan.config(pm = 0xa11140)  # Disable power-save mode
    wlan.connect(secrets.SSID, secrets.PASSWORD)
    max_wait = 10
    while max_wait > 0:
        if wlan.status() < 0 or wlan.status() >= 3:
            break
        max_wait -= 1
        print('waiting for connection...')
        time.sleep(1)
    if wlan.status() != 3:
        raise RuntimeError('network connection failed')
    else:
        print('connected')
        status = wlan.ifconfig()
        print('ip = ' + status[0])
async def serve_client(reader, writer):
    global red
    global green
    global blue
    print("Client connected")
    request_line = await reader.readline()
    print("Request:", request_line)
    # We are not interested in HTTP request headers, skip them
    while await reader.readline() != b"\r\n":
        pass
    request = str(request_line)
    # If the request contains plasma2040 then it should also
    # contain a colour change request - plasma2040/<colour field>/<colour value>
    if request.find('plasma2040/')>0:
        print("Plasma 2040 path")
        # Slice the RESTFul path out of the request
        start = request.find('plasma2040/')
        end = request.find('HTTP')
        path = request[start:end]
        # Split the path
        subpaths = path.split('/')
        # If there are the required parts
        if(len(subpaths)>2):
            #Check for each colour in turn
            if(subpaths[1].find("Red")>0):
                red = int(subpaths[2])
            if(subpaths[1].find("Green")>0):
                green = int(subpaths[2])
            if(subpaths[1].find("Blue")>0):
                blue = int(subpaths[2])
            # Update the LEDs
            set_all_leds()
            # Send back the JSON with the new colour settings
            writer.write('HTTP/1.0 200 OK\r\nContent-type: application/json\r\n\r\n')
            response = '{"field":"'+subpaths[1]+'","value":"'+subpaths[2]+'"}'
            writer.write(response)
    else:
        # If not Plasma2040 send back the HTML
        response = html % (red, red, green, green, blue, blue)
        writer.write('HTTP/1.0 200 OK\r\nContent-type: text/html\r\n\r\n')
        writer.write(response)
    await writer.drain()
    await writer.wait_closed()
    print("Client disconnected")
async def main():
    print('Connecting to Network...')
    connect_to_network()
    print('Setting up webserver...')
    asyncio.create_task(asyncio.start_server(serve_client, "0.0.0.0", 80))
    while True:
        onboard.on()
        print("heartbeat")
        await asyncio.sleep(0.25)
        onboard.off()
        await asyncio.sleep(5)
        
try:
    asyncio.run(main())
finally:
    asyncio.new_event_loop()

References

https://shop.pimoroni.com/products/plasma-stick-2040-w?variant=40359072301139

https://shop.pimoroni.com/products/wireless-plasma-kit?variant=40372594704467

https://learn.pimoroni.com/article/getting-started-with-pico

https://learn.pimoroni.com/article/assembling-wireless-plasma-kit

https://datasheets.raspberrypi.com/picow/connecting-to-the-internet-with-pico-w.pdf

https://en.wikipedia.org/wiki/Ajax_(programming)

https://www.w3schools.com/js/js_ajax_http_response.asp

https://www.w3schools.com/js/js_json_parse.asp

http://json.parser.online.fr/


Saturday, 5 November 2022

PIMORONI Plasma Stick 2040 W


PIMORONI Plasma Stick 2040 W or Wireless Plasma Kit is an LED controller for 5V WS2812/Neopixel/SK6812 LED strips.

It is part of PIMORONI's "Pico W Aboard" range which has a Raspberry Pi Pico W soldered to the board. The board includes a RESET button (saving wear and tear as you do not have to keep unplugging and plugging the USB), a three socket screw terminal for the LED strip and a Qwiic/STEMMA QT connector to add various sensors.
Pimoroni have a quick start guide plus Micropython and C++ libraries.